Showing posts with label belite aircraft. Show all posts

Thursday, April 25, 2013

From Aero-Expo in Friedrichshafen, before going to the show

Please note: James' blog has moved to a Wordpress site. To access it, please visit http://jameswiebe.wordpress.com/. All posts have been transferred to the new site, and all new posts will only be accessible via Wordpress. Thank you for your interest!


Hi Everyone!

I'm attending Aero Expo in Friedrichshafen, Germany.  I just arrived at my hotel late last night.  The show has already been running for a day.  My plan is to visit it today and tomorrow, then perhaps an hour or two on Saturday morning, then head home.  More here on Aero:   http://www.aero-expo.com/.

Jet lag is always an issue.  After a fitful short night of rest on the plane from Chicago to London, I flew on to Munich, then rented a car for the drive down to the Friedrichshafen area.  The joy of the Autobahn.  Yes, yes, yes, it's a thrill.  Please don't tell my wife, but I didn't go much faster than 200 in my clean Skoda with a manual six speed; and it's thrilling to be passed by Über fast cars who clearly want to get somewhere very, very quickly.  You're reading this so I survived.  :-)  That's a speed even Larry K. could appreciate.

Even with jet lag, I got a near solid 8 hours of sleep (thanks to a Tiny Little Sleeping Pill my Doc prescribed before I left Wichita).  Here in Germany, it's already a new day, and the weather is perfect again, the sun is shining, so it's my first day full day on the ground.

I had quite an adventure trying to figure out how to set an alarm last night.  The hotel room has no clock.  So I had to get an alarm from either my new phone, my Kindle, or my computer.  Well..... the phone wouldn't download an alarm app, due to the poor connectivity.  The computer could get one by download from the internet, which I did, but it would also run out of battery power overnight, because my wall socket adapter wasn't the correct size.  Same problem for the kindle.  (I had brought the wrong euro adapter!)

So last night, before I went to bed, I cut the end off a U.S. power cord, stuffed the raw ends in the Euro wall socket, and *voila*, the computer started to charge.  Attached the kindle to the computer, and it started to charge too.  Set a newly downloaded alarm on both, popped my Tiny Little Sleeping Pill, and went to sleep (very quickly).  Reminds of my days with HotPlug at WiebeTech.  (For which I have a patent.)

And it worked.  Computer's battery didn't die.  Neither did the Kindle.  Alarm woke me up.  Otherwise, who knows how many years I would have slept in my coma-like sleeping pill induced haze.

Just had breakfast which they provide in a dining room upstairs.  Basic european fare - rolls, coffee, breakfast meats, boiled eggs, cereal, fruit, juice.  I just had some rolls with butter, very good, then with several cups of their great coffee.  This is one part of Euro travel I really enjoy.  I sat in the dining room, listening to the languages flow through the room like cream mixing in a cup, enjoying three cups of that coffee.

I'll be off to the show in 45 minutes or so.

My email in basket has copies of recent patent filings which were done on my behalf.  In order to expedite the claims, they were done with what is called a provisional patent application.  Two new sets of claims filed back in the states.  Awesome.  I'm looking forward to explaining that.

Finally, I really like the little hotel I selected.  I am staying at the Garni Eden in Meersburg.


Saturday, April 20, 2013

Best deal in the world right now for a small airplane kit. Giveaway Multi Function aircraft instrument.

Please note: James' blog has moved to a Wordpress site. To access it, please visit http://jameswiebe.wordpress.com/. All posts have been transferred to the new site, and all new posts will only be accessible via Wordpress. Thank you for your interest!


I want to give you the new aircraft Multi Function Instrument from Belite.

Of course there is a catch!  You have to buy something else from Belite, as explained below.

The picture below shows it in the Multi Function Instrument.   Click anywhere on it to see the full resolution version on your computer:
Belite Ultralight Aircraft
Multi Function Instrument for Belite,  Free.  With a catch.
Here is the 'catch', or 'Terms and Conditions'.

1.  The Angle Of Attack is not included, but is an option ($700) to this free instrument.  For $700, you get the sensor, the vane, and the separate AOA computer that plugs into the back of this instrument.

2.  The unit includes an inclinometer as shown above.  You can upgrade to the Turn Coordinator for $150 more.

3.  A blank instrument panel is included, ALSO FREE.  This blank CNC cut panel has a custom cutout for the MultiFunction instrument and four 2.25" round cutouts.  The panel is supplied unpainted.  Here is the panel, as typically installed in a plane, with additional instruments:

Multi Function Instrument in Belite metal panel, free*.  *Check T&Cs.
from Belite Aircraft
Painted Blank Panel, part of free*. offer from Belite (supplied unpainted).  *Check T&Cs.
4.  You must buy our Belite UltraCub kit to receive the free MultiFunction Instrument.  The Belite UltraCub is also specially priced; normally $8500, it is priced at $6995 until May 15, 2013.  If you include the value of this instrument, it is about a $550 additional value.  So over $9 grand of Belite Stuff for $6.995 grand plus + shipping.  (Check with Kathy for your shipping quote).

With a little work, along with an engine, prop, etc..., you can make your kit look like this:

Belite UltraCub with 4 stroke 1/2VW engine.
In other words:  you get the Belite UltraCub kit, including the Turtledeck kit, along with a blank panel and this MultiFunction Instrument.  All for $6995 + shipping.  Best deal in the world right now for a small airplane kit.

5.  The Multi Function instrument is available ONLY as configured as shown.  It includes the airspeed indicator with the speed range set as shown; the inclinometer; the fuel gauge (compatible with capacitive or resistive senders), and the AGL altimeter.  The power switch has three settings:  Off, On/dim, On/bright.  The power switch has detents which prevent accidental powerdown.  The dim and bright refer the LED brightness.  Also included are 3 general purpose alarm LEDs.  All alarm LEDs are brilliant red when turned on.  They may be attached to anything:  when grounded, they turn on.  In our Burgundy demonstrator, one is attached to the engine oil pressure switch.

6.  We ran a similar promotion one year ago which was very successful.  This is even better:  the airplane has improved, engine options have improved, and the free instrument set is much better.  And a free metal panel is included.

7.  Like last year, we did not repeat this promotion after the deadline had ended.  This offer will terminate no later than May 15, 2013.

8.  You have to place a nonrefundable deposit of $2500 to get this offer.  You can schedule delivery of your kit for anytime later this year, but not later than Dec. 15, 2013, but the deposit is due on May 15.

9.  This offer is also available on Ready To Fly aircraft:  Just tell us that you want the free Multifunction Instrument upgrade for your RTF plane when you place your order.  Next delivery slot is open for August, 2013.  Check our website for pricing and model configurations.  Prices on our aircraft range from $15995 up to $40K (or more) and this offer is available on any configuration.  You must specify it to receive it.

10.  Just because the multi function unit includes an "AGL" altimeter does not preclude you from adding a conventional altimeter, such as our high resolution digital LCD unit.  It would install in any of the open 2.25" instrument holes.  For example:

Digital LCD altimeter from Belite.  $249.
11.  This offer may be withdrawn or changed at anytime without notice.

Sunday, February 17, 2013

Blue Plane Blue Sky

Please note: James' blog has moved to a Wordpress site. To access it, please visit http://jameswiebe.wordpress.com/. All posts have been transferred to the new site, and all new posts will only be accessible via Wordpress. Thank you for your interest!


First flight of a blue Belite....

Blue Belite flies overhead on first flight
  Many more pics of this experience can be found on Belite's flickr account.

tail assembly
Tail of aluminum Belite ultralight airplane.
Wing lift strut
Lift strut attachment at wing.
flyover
Belite flies by.

Thursday, January 24, 2013

Want to see heavy lifting by a Belite??

Please note: James' blog has moved to a Wordpress site. To access it, please visit http://jameswiebe.wordpress.com/. All posts have been transferred to the new site, and all new posts will only be accessible via Wordpress. Thank you for your interest!


Must see video, showing a Belite slightly over gross weight doing some heavy lifting:

James Wiebe, Belite Aircraft, Hefty Weight!
Click HERE to see the video of the demo flight.

Tuesday, January 1, 2013

Belite Aluminum Ultralight Aircraft Cabin Construction, #7

Please note: James' blog has moved to a Wordpress site. To access it, please visit http://jameswiebe.wordpress.com/. All posts have been transferred to the new site, and all new posts will only be accessible via Wordpress. Thank you for your interest!


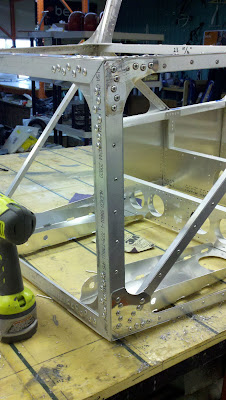
In our continuing series of aircraft construction articles, it's time for a photo review of the cabin assembly prior to covering.

Front Diagonal Support / Star Gusset area
Front view of cabin assembly.
View of Floor Pans, front assembly near firewall, first cross box.
Another view of floor pans and first cross box.
View of internal cabin assembly.  Baggage compartments on left side of photo.  Pivot location has been drilled and nylon 3/8" bushing is clearly (but barely) visible.
Lucky focuses on food.  Windshield support.
Cabin assembly from side.
Top gussets.
Nose of cabin assembly.
Top of cabin assembly.
Chance checks the weight of entire cabin assembly:  22.4 pounds
It is now time to cover the cabin assembly with dacron fabric.  Construction of the interior details of the cabin continues after you've covered the cabin assembly.

Belite Aluminum Ultralight Aircraft Cabin Construction, #6

Please note: James' blog has moved to a Wordpress site. To access it, please visit http://jameswiebe.wordpress.com/. All posts have been transferred to the new site, and all new posts will only be accessible via Wordpress. Thank you for your interest!


#6 in the series.

We will start by attaching the rear fuselage attachment gussets.  There are six:  two on each side, and two on the bottom.  The top side gussets, the bottom side gussets, and the bottom gussets are each unique.  They may vary slightly from these photos in appearance, due to fit and lightening improvements.  Fit, cleco, and rivet them in place, as shown in the following photos:

Bottom Side Gusset and Bottom Gusset, clecoed in place
Bottom Side Gusset, riveted in place
Top and Botom Side Gussets, riveted in place
Bottom Gusset, clecoed in place.
Rivet all six gussets in place.

Now we will work on attaching the 'sun roof skin' to the top of the cabin.

The front vertical pieces are marked and cut off with a dremel tool.
After cutting off the vertical angle aluminum supports, we can add in the two cross tube supports, which were are cut from 1" 6061T6 .063 square tubing.

6061T6 1 x 1 x .063 cross bars.  Cut to length shown.

We will also add in the 1" thinwall tubing, which runs along the top of top door skin, and is shown clecoed in and clamped in place in the following photo.   They are simply cut to fit.

All top cabin tubing shown
Top skin clecoed in place.
Another view of top skin clecoed in place.
Small inside gussets for top of cabin.
Riveting the top sunroof skin in place.
Closeup of corner of top skin.
You'll need to make a bend in the windshield support.

Windshield support with bend.
Windshield support clecoed in.
Windshield support riveted in.
Now it's time to cleco in the remaining baggage compartment dividers.

Pay attention:  the tabs may be bent either way, but only one way is correct.  Study the parts, your assembly to date, and all of the photos to ensure that you do it correctly.  The tabs are easily bent in any brake or even with a bench vise.  There are also hand tools which make them easy.

Baggage compartment divider.

Baggage compartment dividers in place.
Note that the bottom skin is not entirely pre-drilled.  This allows you to fit the best alignment on your baggage divider skins and under the front floor pan (which may require you to drill out a few rivets to fit under).

Bottom skin, ready to install.

 Bottom skin clecoed in place, fit under floor pan and under landing gear gusset.

Bottom skin partially riveted in place.
Rear Landing Gear gussets clecoed in place.
Fabric trim plate for bottom landing gear cross attach post.
Fabric trim plate riveted in place.
Front Diagonal Support gusset, bent and riveted in place.
Front Diagonal Support gusset, riveted in place.
Doublers at engine mount area
Doublers at engine mount area, riveted in place.

Top of cabin, ready to accept gusset.
Bent gusset.
Gusset riveted in place.  One of these rivets will be drilled out.
 One of the rivets will be drilled out in order to accept the "X" steel cross brace.

NEXT:  PHOTO REVIEW OF THE CABIN ASSEMBLY, PRIOR TO COVERING.