Showing posts sorted by date for query blue. Sort by relevance Show all posts

Wednesday, September 21, 2022

Electronic Production Inflation Blues

I took nearly 3 weeks off. The time was spent communing with moose in Wyoming. Yeah, really, ran into 3 of the critters over the course of my camping trip.  One got very close to the blue chair that I was sitting in, and a few moments later I took this pic.

Nice lady, isn't she? She's a pretty big gal, and she's definitely looking at me. Defnitely looking bigger than I remember moose to be.

Which, of course, naturally leads me to my topic of inflation & a small electronic business. (Sorry for the abrupt turn.)

I've seen social media posts talking up a general mistrust in "supply chain issues", especially as it relates to electronics.  Such as electronics for automotive production, or in my case, experimental avionics. Some people mock the reality of these issues.

Here's my reality.

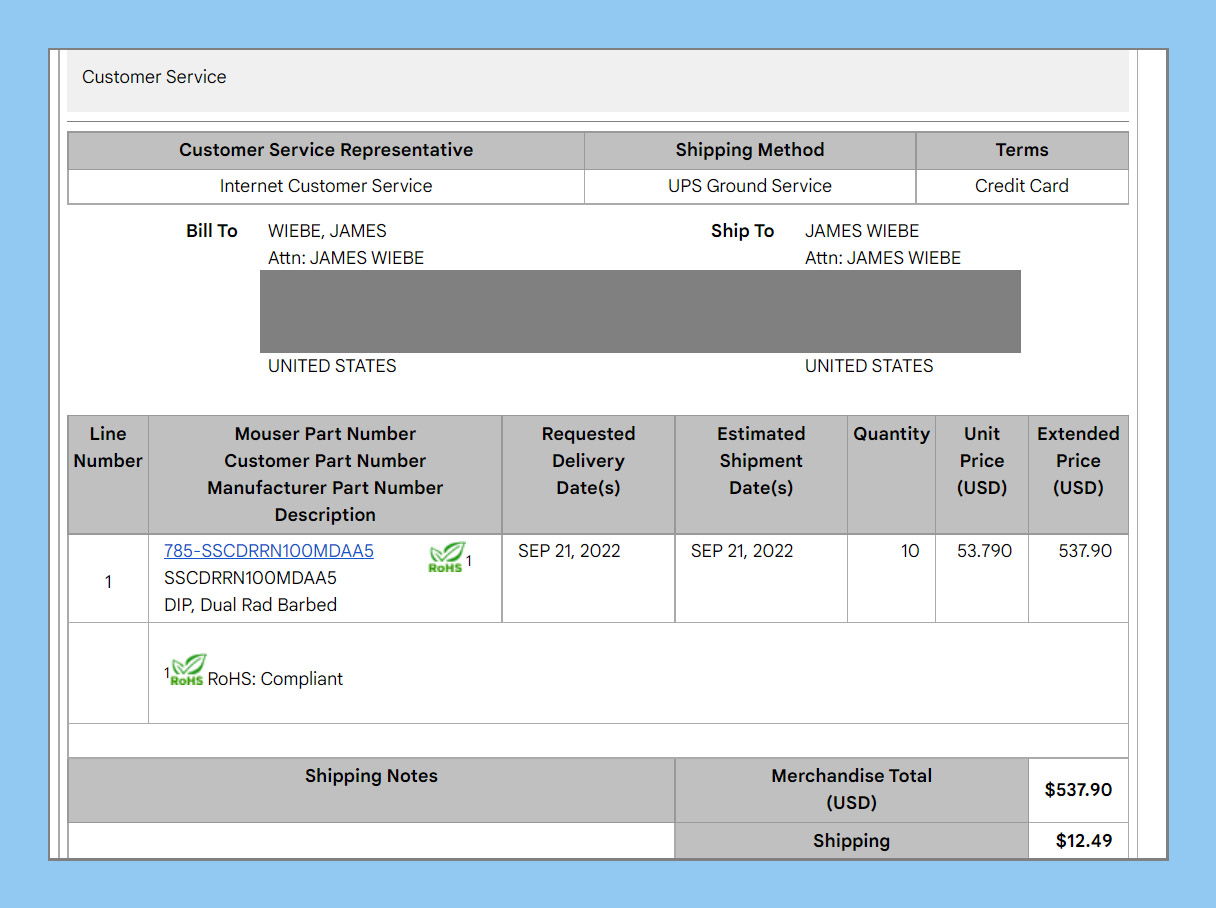
Around two years ago, I started using a very accurate air pressure sensor, as a basis for the air speed sensor within my line of aircraft instrumentation. Drilling down to the exact part in question, it is a Honeywell SSCDRRN100MDAA5.  It accepts a Pitot line (from the ram air) and also a static line (used to establish the differential pressure), thus providing a basis for digitization and eventual display of airspeed in the cockpit of the airplane.

Here is the invoice from two years ago:


And you can see that I paid $31.52 for each sensor.

Here's the invoice from today, as I bought parts to fill orders from customers.

Over the course of 24 months, the price has gone up from $31.52 to $53.79, an increase of 70% on this part. 

Yes, I bought less. And other electronic distributors are posting lower prices than Mouser, from whom I most recently ordered.  But the other distributors have zero stock.

You can see this for yourself by using the global chip finder which is:  FindChip.com, and inserting the part number SSCDRRN100MDAA5 into the search field.  Every part in the distribution system on the planet will show up.  Most distributors have zero stock; the ones that have parts have high prices.  Pick your poison: ship nothing and suffer; or buy parts and kill your margins.

Meanwhile, I have not passed any cost increases on to my channel or distributors. And I'm going to be the bad guy by eventually passing these increases on... except I'm not.  I'm just a small businessman trying to maintain margins, on average, across the board.

Which gets me to the bad news: The promotional prices for Radiant Instruments Gen-2 instruments ends at the end of September. Our older instrument product line will also go up in price starting October 1.  As of this writing, Aircraft Spruce has placed some orders at lower prices, and so they will be receiving some stock of our classic instruments (for instance, Radiant Turn Coordinator) and will be able to honor older pricing while their inventory holds together.  You can always find out what's in stock at Aircraft Spruce by searching Radiant in their website search bar. Most of our product line comes up, and things that are in stock are identified.

Arrgh.

Back to production tasks, now.  I promised Kathy that we would ship some orders tomorrow. 

...Hoping to repair the gross margins next month as prices go up. Hoping people still buy my stuff.

Best Regards,


Saturday, January 8, 2022

Details on Ultralight Honeycomb Cabin

I'm now 34 hours into the build of a Chipper ProCub / UltraCub 2022 prototype aircraft. The design has the following characteristics:
  • Safety first, with an enclosed robust cabin
  • Compliant with FAR Part 103
  •     - single seat
  •     - empty weight of 254 pounds
  •     - stall speed of 28 mph or less
  •     - full power cruise speed of no greater than 62 mph
  •     - maximum fuel capacity of 5 gallons
  • Easy to build
  • Classic good looks, unapologetically an airplane 
  • Inexpensive
  • Quick building
  • Folding wings
  • Fantastic flying manners
  • STOL capability is a plus.
 A shoutout to my friend Landon!, who painted the seat in the photo. This seat was made for and first flown in my skydock design, and it looks great with the old Belite logo and gloss blue color. Everytime I do work on an ultralight, I find this seat and set it in the design to see how things are shaping up. I do have a list of brief skydock videos,


but I digress. Back to the business at hand. Here's the visual progress report on this Saturday:


Below is a closeup on that seat. It is resting on two honeycomb bulkheads, along with the backrest honeycomb cross piece. The honeycomb has been cleaned up with an aluminum cap on the heavier 3/4" rear bottom honeycomb and backrest cross piece. The front cross piece has a vinyl cap. Look carefully into the small 'windows' in the sides of the cabin, and you can see where I've begun to install aluminum tape over exposed honeycomb.


Another photographic point of view. The cabin is currently in 'flintstone' mode as the bottom skins aren't yet installed.


Yesterday, I designed a couple of new gussets for the top of the cabin. They are highlighted in green:


Today, I cut them on the shopbot and installed them. Here's the forward gusset. You can see the mirror part on the opposite side of the cabin as well. I pre-primed them before I installed them. The tab is intentionally overbent to keep the sharp edge away from the pilot-occupant.


For that matter, all of the gussets are bent with safety in mind. The tabs almost always face away from the occupant.

I already mentioned the backrest cross support piece. It is fabricated from 3/4" honeycomb, and then held in place by pairs of aluminum angles which were bonded using epoxy. I prefer 3m 2216, but I had original formula JB Weld on hand, so I used it.


The photo shows the parts bonded together and held with temporary bolts. As the rear fuselage side skin is not yet installed, these bolts will eventually be replaced and redone with washers along normal practice lines.


Changing my focus to the front box, I'm really pleased with the quality of the CNC parts; the general fit, and the way this is beginning to look. I'm excited for how things will be when the windshield and engine cowl are added. I'm designing a new cowl which reflects the fresh new look of this airplane; I won't be using the old radial bump design anymore.


I mentioned earlier that the cabin was still in flintstone mode (no bottom skin yet); these photos show the detail of the structure as seen from the bottom.


Make sure you've seen my youtube videos which show this evolving project:

This one talks about adding metal skin to the rear fuselage in CAD:

This one talks about using Sketchup to make this design:

Finally, as I am in bootstrap mode, I get a lot of enthusiasm and deeply appreciate my patrons. $10 per month gives you the rights to the blueprints for this plane (terms and conditions apply) and $35 per month indicates that you plan to purchase a kit. $80 indicates that you plan to purchase a Ready To Fly; I've set the price for the first 3 RTF planes at $30,000 in taildragger configuration and basic instrumentation.

Become a patron here:

www.patreon.com/jameswiebe

Thanks for reading,


P.S., this is how the cabin CAD looked on December 12, a little less than one month ago. It's come a long way!


Monday, November 22, 2021

Breaking the Landing Gear Bulkhead on my Chipper 2

Stupid Pilot Tricks...

I had just installed the new oil thermostat in my Chipper 2.  I pulled the plane out of the hangar, eager for a break in the routine.  (I was early in the process of installing shock absorbers on the plane.) It was a beautiful afternoon, the sky was blue, the grass was green, and the plane was gorgeous.  

Chipper 2 N318KW stock photo, before recent events.

As usual, my UL350iS powered up without a hitch. My goal was simply to warm up the engine and check oil pressure & temps. The process of warming up was taking a long time (it was a little chilly) and I advanced power while keeping the brakes engaged.  This went on for several minutes. I edged the power up a bit more. My brakes were having a hard time keeping the plane from creeping forward. I'd ease back on the power, hold the brakes a little tighter, and advance power again.

All of this was extremely poorly thought out.

After advancing power again, the plane started to list to the left and settle down to the ground, like it was kneeling. Realizing that a prop strike was imminent, I retarded throttle. The tip of the prop cut into the soft grass and dirt, carrying through several blades before all became silent.

I broke my plane.

I did not take a picture. I was flaming mad. My hangar mates swiftly emerged from a hangar backroom, having heard the commotion, and walked towards me as I got out of the kneeling airplane and looked at one gear leg bent backwards. I realized that I had twisted the gear attach bulkhead. (The gear leg was not hurt.)

Then I realized I had forgotten to re-install the trailing links, so I had just ripped my gear out because of my forgetfulness.

With the help of my friends, we rolled the wounded bird back into the hangar. 

The inside of the cockpit looked like this:

And after several days of drilling out rivets, chopping out aluminum bulkhead, and cutting / pulling / fussing / fuming, the removed bits looked like this:

Over the course of the Thanksgiving holiday, I will be stepping you through what I have learned on how to repair this problem in my Chipper. I have also been using this opportunity to solve some other problems.

1) Improved bulkhead assembly for potentially higher gross weight

2) Shock absorber installation for potentially higher gross weight

3) Improvements in mounting techniques for bolts in honeycomb

4) Improvements in bonding techniques

5) General proof that this structure is repairable

And as I head into the Thanksgiving break, things are much improved. Here's a photo of how things were looking earlier this afternoon.


I do all my airplane stuff at 29KS, which is the Wichita Gliderport. It has many very smart aviation people who hangar there and build / rebuild / repair things there.

The benefit of this unfortunate event is that I am receiving honeycomb repair and assembly advice from another of these hangar mates. 

I'm going to take a moment out to brag on some of my aviation friends:

    N.: ex-CTO of Mooney Aircraft
    CW.: A&P/IA, formerly with Textron, traveled the globe fixing King Airs, versed in everything including honeycomb
    D.: A&P/IA, formerly built parts for Mosquito Helicopters, currently starting a Piper Cub parts company, currently rebuilding 3 Cubs, has built 7 Pietenpols lifetime to date, with the last one nearly done right now
    CP: 50 years with Cessna engineering, knows everything about any piston aircraft they designed. He can tell you why various Skylanes had weight changes, cabin changes, structure changes, feature changes. He is the walking and talking encylopedia of Cessna singles. 
    K: Designed composite propellers for McCauley, currently working for Textron special ops.
 
In particular CW has taken an interest in Chipper 2 and its proper repair. 

Bottom line: after this rebuild, I believe that the gear mounting bulkhead will be strong enough so that failure will not occur when the trailing link is not installed.

Thanks for reading. Please "Follow" this blog by clicking on the Follow button.  You'll be advised every time I post the next article.

Live & Learn.


Monday, March 18, 2013

Construction of Tail Feathers

Please note: James' blog has moved to a Wordpress site. To access it, please visit http://jameswiebe.wordpress.com/. All posts have been transferred to the new site, and all new posts will only be accessible via Wordpress. Thank you for your interest!


Aerodynamic Tail Feather construction for a Belite

We'll cover both pieces of our horizontal tail assembly in this document:  the elevator, and the horizontal stabilizer.

Construction of both pieces is very similar.  Please refer to the blue prints for layout dimensional information.

Prior to assembly, all wood pieces are sanded and deburred.  Steel and aluminum pieces are cleaned.  Steel pieces are also painted, except where glue joints will be.  (We cover the steel pieces with strategically placed masking tape, then spray paint is applied.)

Let's start with the elevator.  We use 3M 2216 glue to attach the wood ribs to the elevator spar.  We also glue tail end gussets to the end of each rib using high quality wood glue.

Elevator Assembly already under way.
The trailing edge is fitted into place.  It will fit snugly over the wood ribs and gussets.  The trailing edge usually has a plastic film both inside and outside; remove the film.

Trailing edge being fitted over elevator.
Still checking fit of trailing edge.
Trailing edge cut to length.
Now it is time to install the four bolts, one on each torque arm.

Bolts added.
Use rivets to hold the trailing edge in place.  Rivet washers are also used on the underside.

Trailing edge riveted in place.
The wood strips are prepared by gluing in spacer blocks.

Wood strips and spacer blocks, glued together.
The wood strips are then glued to the wood ribs.

Wood strips glued to wood ribs.
Closeup of clamping detail.
Two pieces of trailing edge material are cut to fit in the center section.
Preparing the center section trailing edge.
More preparation.
Glue the balsa block on each end.  Make room for the top of the bolt.  Also, unlike shown below, it may be helpful to pretrim the outline of the rib in the balsa.

Balsa block glued.
 The center section must also be riveted in.

Riveting in the center section trailing edge.
Adding more paint.
Alternate viewpoint.
End balsa cap, ready to be rough cut to shape and sanded.
Insulating Foam injected around blocks to add stiffness.  Trimmed flush after setting.
Center section cleaned up very nicely.
 After everything is sanded, apply at least two coats of varnish before covering.

Varnish the wood!

 Next, we'll finish up the horizontal stabilizer.

TO BE CONTINUED....


Wednesday, February 27, 2013

Floats, Tricycle Gear, Turtledeck, Builder tips

Please note: James' blog has moved to a Wordpress site. To access it, please visit http://jameswiebe.wordpress.com/. All posts have been transferred to the new site, and all new posts will only be accessible via Wordpress. Thank you for your interest!


Something for everyone...

One sneek picture of an amphibious float is somewhere below...

Pics of the Sky Blue plane with a turtledeck on it, builder tips for those builders seeking help, photos of a tricycle gear fuselage under construction, photos of a primed fuselage, carbon fiber spars, all for the ultralight Belite Aircraft.

By the way, my heart goes out to designers of amphibious floats.  Hardest design project, ever.


Carbon fiber spar with jury strut fitting.  Wrapped with carbon fiber rope and epoxied.

Sky Blue Ultralight Belite with turtledeck.

Another view of the sky blue ultralight Belite Aircraft.

Blurry picture of lift strut fitting, with carbon fiber rope and epoxy.

Messy job on the glue, but aluminum doubler (2.75" OD) over carbon fiber spar.  Tripler on inside root.

New design Belite door.  Coolest ultralight aircraft door, ever.

CNC cut frame on inside of door frame.  Note two pins for locking door closed.

We added corner pocket windows to this Belite.  Edge of  polycarbonate door panel is visible.

This side of the plane has a polycarbonate window installed.  Easily removable 'cuz we used Nutserts.

Swing the door up.  Someone really ought to add a gas lift strut.

Door hinge installed on top of door.


Picture of amphibious float.  How'd this photo slip in here?

Really bad photo showing one way to overlap fit trailing edge material together.

Another way to fit trailing edge together.  Works with wood ribs if you use a left and right gusset.

Tricycle gear airplane under construction.

Finishing tail of tricycle gear airplane.

Underside of rear deck, showing structure. 
Gusset detail on tricycle gear airplane. 

More gussets.

This gusset is doubled, as gear hinge will be bolted here.

And here as well.  Doubled.

Another view of the bottom of the rear deck.

View of the front.  Nose gear not yet installed.

Detail of front of fuselage.

Detail of front of fuselage.

Some aluminum primer, some paint.  This bird nearly ready to cover.