Short post:
I'm not a deer hunter. I've occasionally mused on the idea; ... maybe some day.
This evening, I spotted a group of 14 deer while flying in the neighborhood of home field. About half of them had antlers, and one was a very nice buck. No, I won't tell you exactly where I saw them.
I made several circuits around their field, recounting and noting the number of bucks.
Awesome. Awesome!

"The Standard Pilot Blog"TM The Chipper and Radiant Blog for Experimental and Ultralight (Part 103) Aircraft (c) 2010 thru (c) 2020 by James Wiebe.
Sunday, October 3, 2010
Wednesday, September 29, 2010
Even MORE INFO on Stall Speed, Vortex Generators and Ultralight Aircraft
If you haven't been on this blog in the last few days, there are several new posts. Don't miss the post on landing in a hayfield!...
The following is a discussion which will intertwine some stall speed testing and also some slight discussion on vortex generators.
A couple of months ago, I mentioned that I had put Vortex Generators on a Belite. I was not able to provide much substantial information to you, my faithful reader, as to how they performed. I'm still don't have much to offer, but I have begun to experiment with their placement on the wing.
I also recently discussed the FAR Part 103 mandated stall speed requirement of ultralight aircraft. My blog post on that topic may be found here.
So here's a little more info.
We've had a few days of smooth air, and smooth air is absolutely intentional when performing stalls at absolute minimum airspeed. Any disruption of the smooth air causes the plane to stall, screwing up my testing. This is critically important when we are talking about stall speeds of less than 30mph.
Acting on a hunch related to my impression of the high angle of attack on our Riblett designed airfoil, I moved the Vortex Generators closer to the leading edge of the airfoil, which you can see here:
I then did some test flights. But a new problem was emerging: my airspeed indication was failing completely at the extremely high angles of attack which I was testing.
In looking at the pitot tube, I suspected that the air intake on the pitot tube was 'micro-stalling', due to the non-parallel flow of air hitting the pitot tube obliquely at the high angles of attack. In other words, the pitot tube needed to match the flow of air, not be parallel to the bottom of the wing. I mentioned this to Gene, and he simply grabbed the pitot tube and started to bend it down.
"If you do this slowly, you can do it without breaking the tube," he said. Hmm. He was right.
After he bent it a little, I bent it a little more. The pitot tube was now bent distinctly downwards.
I then performed another test flight in the plane. After placing the airplane into a minimum controllable airspeed, I captured the following pic:
The above picture nicely illustrates the very high angle of attack. Due to the fact that the engine is throttled back, it is safe to assume that the actual angle of attack is higher than what is illustrated: the airplane is descending!
As I maintained this very low airspeed, I focused my attention on the instrument panel, and captured another picture of the flight condition:
The instruments are a little hard to read in the photo above, so I've enlarged that part of the pic:
The altimeter is reading 700 feet; the air speed indicator is reading 30mph, the RPM is showing 4700, and I was able to sustain this low flight mode without stalling the airplane.
The 30mph LED is actually a speed range indication: the actual indicated speed of the aircraft is somewhere between 28 and 32.5 mph. This is subject to several different errors, such as pitot installation error (EG, the pitot is not located far enough forward of the leading edge; or it is not parallel to the flow of air....), instrument design / calibration error (I try and make a good instrument, but it's not perfect....), etc.
And if I pulled the nose back just a smidge more, the airplane stalled. I was able to get the 28mph LED to flicker on a time or two as the plane progressed through the stall.
The aircraft weight, as tested, was around 522 pounds including airframe, parachute, pilot, and fuel. This is substantially higher than the FAA mandated testing weight -- I would need to lose considerable weight to get down to the mythical FAA weight of 170 pounds.
TECHNICAL MATH STUFF STARTS HERE...
Let's do the math for predicting our stalling speed, and then compare it with what the LED Air Speed Indicator was telling me:
Using the textbook calculations for stall speed, which I first mentioned several months ago:
Vs=SQRT(2*Weight/(Rho*Area*Cl))
Where the following variables apply (using English units of measurement):
Weight = Weight in Pounds of the loaded flying airplane = 522 pounds
Rho = Density of Air = .00237 slugs / ft3 (Temperature = 59 degrees, at sea level.)
Area = Wing Planform Area in SF = 101 Square Feet for this test
Cl = Coefficient of Lift = estimated at 2.4
So our equation now looks like this:
SQRT (2*(522) / (.00237*101*2.4)) = 42.63 ft/sec = 29.1 mph predicted stalling speed (at a weight of 522 pounds)
and this agrees with my observation -- the stall speed was above 28mph.
Now let's change the weight to a mythical amount of 478 pounds. (278 pound airplane with chute and goodies, 170 pound pilot, 30 pounds of fuel).
and let's rerun the math with this new hypothetical weight:
SQRT (2*(478) / (.00237*101*2.4)) = 40.8 ft/sec = 27.8 mph predicted stalling speed (at a weight of 522 pounds) (The FAR Part 103 requirement is 28.0 mph.)
END OF TECHNICAL MATH STUFF -- YOU CAN BREATH A SIGH OF RELIEF
Earl Downs told me anecdotally a few weeks ago that the original Kitfox Lite was designed to barely meet the stall speed requirement of FAR Part 103. Since our wing is the same aerodynamics, we've matched that characteristic. And we keep finding that the math (and the actual results) point to a stall speed which is right at or under 28 mph.
This all makes sense -- the highest possible stall speed would also correlate to higher cruise speeds with the least amount of horsepower. In other words, you can touch both ends of the FAR Part 103 ultralight aircraft flight envelope with a Belite - from 28mph stall to 62mph cruise.
Now some thought kickers for you to consider:
1) These results were tested at fairly high density altitudes. What would lower altitudes and temperatures do to the results?
2) Does FAR Part 103 care that the stall speed is higher as the cabin load is increased?
3) What effect, if any did the vortex generators due to the stall speed?
4) Is it fun to fly around with the airspeed indicator showing just 30mph? [Answer is YES!]
The following is a discussion which will intertwine some stall speed testing and also some slight discussion on vortex generators.
A couple of months ago, I mentioned that I had put Vortex Generators on a Belite. I was not able to provide much substantial information to you, my faithful reader, as to how they performed. I'm still don't have much to offer, but I have begun to experiment with their placement on the wing.
I also recently discussed the FAR Part 103 mandated stall speed requirement of ultralight aircraft. My blog post on that topic may be found here.
So here's a little more info.
We've had a few days of smooth air, and smooth air is absolutely intentional when performing stalls at absolute minimum airspeed. Any disruption of the smooth air causes the plane to stall, screwing up my testing. This is critically important when we are talking about stall speeds of less than 30mph.
Acting on a hunch related to my impression of the high angle of attack on our Riblett designed airfoil, I moved the Vortex Generators closer to the leading edge of the airfoil, which you can see here:
 |
| Vortex Generators on an Ultralight Aircraft, EG: Belite Superlite Dragon |
In looking at the pitot tube, I suspected that the air intake on the pitot tube was 'micro-stalling', due to the non-parallel flow of air hitting the pitot tube obliquely at the high angles of attack. In other words, the pitot tube needed to match the flow of air, not be parallel to the bottom of the wing. I mentioned this to Gene, and he simply grabbed the pitot tube and started to bend it down.
"If you do this slowly, you can do it without breaking the tube," he said. Hmm. He was right.
After he bent it a little, I bent it a little more. The pitot tube was now bent distinctly downwards.
 | |
| pitot tube bent downward on ultralight aircraft, EG Belite Superlite Dragon |
 |
| A picture showing a high angle of attack on a Belite |
As I maintained this very low airspeed, I focused my attention on the instrument panel, and captured another picture of the flight condition:
 |
| Cockpit panel view during Vortex Generator Stall Test |
 |
| Closeup of instruments |
The 30mph LED is actually a speed range indication: the actual indicated speed of the aircraft is somewhere between 28 and 32.5 mph. This is subject to several different errors, such as pitot installation error (EG, the pitot is not located far enough forward of the leading edge; or it is not parallel to the flow of air....), instrument design / calibration error (I try and make a good instrument, but it's not perfect....), etc.
And if I pulled the nose back just a smidge more, the airplane stalled. I was able to get the 28mph LED to flicker on a time or two as the plane progressed through the stall.
The aircraft weight, as tested, was around 522 pounds including airframe, parachute, pilot, and fuel. This is substantially higher than the FAA mandated testing weight -- I would need to lose considerable weight to get down to the mythical FAA weight of 170 pounds.
TECHNICAL MATH STUFF STARTS HERE...
Let's do the math for predicting our stalling speed, and then compare it with what the LED Air Speed Indicator was telling me:
Using the textbook calculations for stall speed, which I first mentioned several months ago:
Vs=SQRT(2*Weight/(Rho*Area*Cl))
Where the following variables apply (using English units of measurement):
Weight = Weight in Pounds of the loaded flying airplane = 522 pounds
Rho = Density of Air = .00237 slugs / ft3 (Temperature = 59 degrees, at sea level.)
Area = Wing Planform Area in SF = 101 Square Feet for this test
Cl = Coefficient of Lift = estimated at 2.4
So our equation now looks like this:
SQRT (2*(522) / (.00237*101*2.4)) = 42.63 ft/sec = 29.1 mph predicted stalling speed (at a weight of 522 pounds)
and this agrees with my observation -- the stall speed was above 28mph.
Now let's change the weight to a mythical amount of 478 pounds. (278 pound airplane with chute and goodies, 170 pound pilot, 30 pounds of fuel).
and let's rerun the math with this new hypothetical weight:
SQRT (2*(478) / (.00237*101*2.4)) = 40.8 ft/sec = 27.8 mph predicted stalling speed (at a weight of 522 pounds) (The FAR Part 103 requirement is 28.0 mph.)
END OF TECHNICAL MATH STUFF -- YOU CAN BREATH A SIGH OF RELIEF
Earl Downs told me anecdotally a few weeks ago that the original Kitfox Lite was designed to barely meet the stall speed requirement of FAR Part 103. Since our wing is the same aerodynamics, we've matched that characteristic. And we keep finding that the math (and the actual results) point to a stall speed which is right at or under 28 mph.
This all makes sense -- the highest possible stall speed would also correlate to higher cruise speeds with the least amount of horsepower. In other words, you can touch both ends of the FAR Part 103 ultralight aircraft flight envelope with a Belite - from 28mph stall to 62mph cruise.
Now some thought kickers for you to consider:
1) These results were tested at fairly high density altitudes. What would lower altitudes and temperatures do to the results?
2) Does FAR Part 103 care that the stall speed is higher as the cabin load is increased?
3) What effect, if any did the vortex generators due to the stall speed?
4) Is it fun to fly around with the airspeed indicator showing just 30mph? [Answer is YES!]
Tuesday, September 28, 2010
a Hayfield Landing Highlights Belite's Utility
Long time readers of this blog may be aware that I have had training in mountain flying. I've been to Idaho many times, and I've enjoyed the skills I've acquired through mountain flying school and through practice into short, odd airfields. A recent post on this subject concerned several camping trips into the Thomas Creek airstrip. Another post covered, among other thing, a series wasp bites and and description of the gnarly final approach into the Shearer airstrip, deep in the Selway-Bitterroot wilderness in Idaho.
I enjoy flying into tight, short airfields that curve, hug terrain, pass by trees, and slope uphill. Ideally, they end in the side of the hill (and offer good camping and fishing nearby).
There is a hayfield next to our primary runway that offers some of these characteristics. It slopes uphill. It has a nice collection of trees. It has bumps. It has quite a bit of grass and weeds. It is relatively short. It is 'unimproved'.
It is an ideal location for showing the landing capabilities and utility of our airplane. The rough ground is a great demonstrator for our spring landing gear.
I wanted to demonstrate a nice 3 point landing, uphill, through the hayfield. I asked my able assistant Gene Stratton to standby and take pictures. I promised him a series of approaches into landing. As I 'dialed in' the strip, I was able to establish a final approach of just a few feet over the weeds at the beginning of the field. (Good mountain flying technique suggests the ability to hit a 50 foot spot... every time. You can do that with a Belite.)
The photos show the story.
This flight occured on September 28, about 1:30 in the afternoon. I tracked down final, adjusting for the crosswind. (Gene and I talked about my final approach crab angle after we debriefed on the ground, post-flight.) Winds were out of the north, 12 knots gusting to 19 knots. Engine power was set at about 35HP, even though the big Hirth develops 50HP when it's fully unleashed. Landing direction was ENE; about a 50 degree crosswind. FWIW, Wichita (KICT) Metar weather was:
If you are a potential purchaser, you might compare our Belite with other less capable ultralight aircraft that have stiff gear and no crosswind capabilities and no off-field capabilities and no ChromAloy steel in their structure -- in other words, ultralight aircraft that lack safety, strength, and fun.
A Belite exudes utility and usefulness, and is a blast to fly.
-- Photo credits: Gene Stratton.
I enjoy flying into tight, short airfields that curve, hug terrain, pass by trees, and slope uphill. Ideally, they end in the side of the hill (and offer good camping and fishing nearby).
There is a hayfield next to our primary runway that offers some of these characteristics. It slopes uphill. It has a nice collection of trees. It has bumps. It has quite a bit of grass and weeds. It is relatively short. It is 'unimproved'.
It is an ideal location for showing the landing capabilities and utility of our airplane. The rough ground is a great demonstrator for our spring landing gear.
I wanted to demonstrate a nice 3 point landing, uphill, through the hayfield. I asked my able assistant Gene Stratton to standby and take pictures. I promised him a series of approaches into landing. As I 'dialed in' the strip, I was able to establish a final approach of just a few feet over the weeds at the beginning of the field. (Good mountain flying technique suggests the ability to hit a 50 foot spot... every time. You can do that with a Belite.)
The photos show the story.
 |
| Hayfield Short Final, over the weeds. I love this picture. |
 |
| Over the 'numbers', field slopes uphill from here. Another great pic. |
 |
| Wheels kiss down on the Hay |
 |
| Another approach, a little higher |
 |
| Rollout in the hay, uphill. |
 |
| Engine shutdown after taxi back |
 |
| I'm posing by the Superlite |
 |
| Belite Superlite poses in the grass, by the trees. Where's the trout stream? |
KICT 281753Z 01012G19KT 10SM SCT044SCT150 SCT250 24/13 A2998
If you are a potential purchaser, you might compare our Belite with other less capable ultralight aircraft that have stiff gear and no crosswind capabilities and no off-field capabilities and no ChromAloy steel in their structure -- in other words, ultralight aircraft that lack safety, strength, and fun.
A Belite exudes utility and usefulness, and is a blast to fly.
-- Photo credits: Gene Stratton.
Belite Fuel Gauge Installation
Our Belite Electronics are keeping me running, just catching up with orders. (And no, we're not caught up with orders. Not yet, anyway....)
One of the more popular products is the Belite Fuel Gauge.
Types of Belite Fuel Gauges
It's available in a version compatible with standard 2.25 inch instrument cutouts ($74.95):
 |
| Fuel Gauge from Belite with 2.25 inch round bezel |
 |
| Fuel Gauge from Belite with 1.75 inch square bezel |
The electronic design of each of these products is identical; the only difference is the bezel size and dimension. They are designed to attach to a "capacitive fuel gauge", which is available from us and from several other vendors in varying lengths. (No secret here: we use one manufactured by Falcon Gauge.) Here's what a "capacitive fuel gauge" looks like ($99.95):
 |
| Capacitive Fuel Probe, 12 inch length. |
Installing the Fuel Gauge and Fuel Probe in your airplane
Hooking these things together is not difficult! Basically, this is what you need to do:
1) Install the Fuel Gauge in the panel. 2 screws and a hole in your panel gets this done.
2) Install the Fuel Probe in your tank. The one we sell is 12 inches long, it may be put at an angle inside the tank. Different probe lengths are available from Aircraft Spruce. Some are bendable. (You bend them only where they enter the tank, the remainder of the probe goes through the tank at a diagonal.) Here's a photo of a fuel probe, installed in a tank with a depth of 8". The capacitive probe was bent and fitted through a hole in the top of the tank, then attached to a small block of wood and bonded to the tank with a fuel proof expoxy.
 |
| Capacitive Fuel Probe installed in tank |
3) Attach our Fuel Gauge to a source of power. A 9 volt battery works great; as does regular +12 volt system power. (+12 volts is probably a better choice, because the separate fuel probe requires +12 volts). This power goes to the power connector on the back of our unit. Attach the ground as well.
4) Attach the Capactive Fuel Probe to a source of power. +12 volts works just fine. This goes to the red wire, attach the black wire to ground.
5) Attach the Fuel probe sender level wire (yellow color) to our Fuel gauge connector (usually this wire is marked with "FG" or something like that; it's the middle position on the fuel gauge connector). (Yes, you'll have to run some wire from your fuel tank to your fuel gauge.)
6) These two units also need a common ground. This just means that the ground from the Fuel Gauge must be common to the ground at the Fuel Probe. This is usually done through the metal frame of the airplane, but can also be done by a good ground wire as well.
At this point, if you turn everything on, you'll show the amount of fuel in your tank. Well, not exactly; because it hasn't been calibrated yet.
Calibrating the Belite Fuel Gauge.
USE CARE AND CAUTION WHEN HANDLING GAS!!!!!
1) Make sure the end of the fuel probe is about 1/4 or 1/2 inch above the bottom of your fuel tank.
2) When the fuel tank is empty, adjust the 'empty' trimmer on the fuel probe so that the only LED illuminated on the fuel gauge is the 0% (EMPTY) indication. Be careful, it may be a very slight adjustment.
3) When the fuel tank is full, adjust 'full' trimmer on the fuel probe so that the 100% LED (FULL) is illuminated. Be careful, try and adjust so that the 100% LED is barely enabled.
4) Empty the gas tank and verify the LED indications as the tank empties. Readjust trimmers as necessary.
5) Use common sense when flying with your new Belite gas gauge. Assume that your gas gauge is inoperative if it does not agree with your normal pilotage fuel consumption calculations.
Fuel Gauge FAQ's
1) Will the Belite Fuel Gauge work with anyone's fuel probe? A: It will work with any fuel probe that outputs 0 to 5 volts.
2) What happens when the gas is below the bottom of the fuel probe? A: If properly calibrated, the Fuel Gauge will show 0%; your engine will continue to run as long as you have usable fuel in the tank.
3) How are the markings on the Fuel Gauge designed to work? A: When the Fuel Gauge indicates 50% remaining, that means that the tank has at least 50% of the fuel capacity remaining. When the the 50% LED goes out, and the 40% LED turns on, this means you have between 40 and 49% of your fuel remaining.
4) Are the readings accurate? A: If properly installed and calibrated in a square tank, they are reasonably accurate. However, you must test your readings using a real fuel consumption test, with dip level verification of the tank readings.
5) Are the readings accurate in a round tank (such as Belite's spun aluminum fuel tank, placed on its side)? A: They are reasonably accurate at the full, 60%, 50%, and 40%, and at empty. Due to the circular tank, the fuel reading is not linear. However, it's still completely useful information, because it can be used to compare fuel burn and gain judgement to fuel exhaustion from flight to flight.
6) How much power does the Belite Fuel Gauge use? A: About 20ma. It will run off of 8 AA (== +12 volts) batteries for approximately 100 hours!!!! (Not counting battery current drain of Fuel Probe.)
7) What is the labeling on the face of the Belite Fuel Gauge made from? A: It's made from a waterproof membrane. It doesn't shrink or wrinkle in humidity. (This is a recent change to our production.)
8) My Fuel Gauge has four wires going to the connector?! What's the fourth wire for? A: Two wires are power (ground and +12v); one wire goes to the fuel probe, and the fourth wire is a dimmer input to the LEDs. Leave it UNCONNECTED and you will have full brightness. Connect to +12V, and the LED display will dim.
Have any more Fuel Gauge questions? Give us a call or send us an email, info@beliteaircraft.com
-- James
Kitplanes Magazine Comes and Visits...
We were pleased to have Ed Wischmeyer with Kitplanes magazine pay us a visit today!
I had a great time showing Ed our airplane and our shop. We'll see what he has to say in a few months.
Pictured below is Ed, after he completed a test flight in the Belite Superlite.
I had a great time showing Ed our airplane and our shop. We'll see what he has to say in a few months.
Pictured below is Ed, after he completed a test flight in the Belite Superlite.
 |
| Ed Wischmeyer of Kitplanes magazine concludes a test flight and makes some notes. |
Monday, September 27, 2010

Saturday, September 25, 2010
Thunderbirds, Kathy and James, and Pres Huston
A mix of thoughts:
The USAF Thunderbirds are performing in Wichita this weekend.
One of the benefits of owning an aircraft company in Wichita, KS is receiving an invitation to a reception in honor of the Thunderbirds, at McConnell AFB. (I say this with a hint of humor -- with four full time employees, [including myself, Kathy] we are not (yet) deserving of such an invitation, but we are very appreciative.)
The reception had some great food. Before the jazz band started playing, we were privileged to hear from 3 WWII veterans. The first of these three men was Loren Corliss, and he told a gripping story of parachuting out of a destroyed B26, then surviving and moving through the jungle, towards eventual rescue many days later. This man's story was originally told and printed in our hometown Wichita Eagle, in an article which you can read here.
Loren's rescuer was a PBY Catalina pilot, who landed in hard surf, and yanked Loren Corliss and several others out of war's grip to safety. Loren Corliss never knew or got to thank his rescuer, until the story ran in the Eagle, and his rescuer read the story -- and discovered who he had rescued.
The rescuer was Harold Strub. Harold was our second speaker last night. His story of landing in extraordinarily difficult conditions was amazing. You can read his story here.
The first person account of both these veterans held the entire crowd in awe.
A third WWII veteran also spoke; I'm sorry that I don't have his name. He had bailed out of another plane over Italy during the war; badly burned, and losing both hands, he still survived. Another gripping story.
I thought of my father-in-law, Pres Huston. Now deceased several years ago, I was reminded of his participation in WWII; how he fought, how his voice would now sound older and more grizzled were he still alive. How he would also have stories to tell. How he was a peer of our aging WWII veterans, with just a few still living.
After the aging veterans had said their pieces, the USAF Thunderbird lead pilot made comments of these aged veterans: echoing comments made by other writers, "these were our greatest generation".
I thought again of Pres Huston.
My wife, Kathy, was standing in front of me. I gently stroked her shoulder, as we listened to the speakers, as I thought of Dad.
The evening ended; the huge Thunderbird group left; the band continued to play.
 |
| USAF Thunder Bird Lead Solo Rick Goodman, with Kathy and James |
Tuesday, September 21, 2010
Flying the Belite Ultalight Aircraft - Part 3
This is the third of three parts.
Approach and Landing
Flying an airplane is one of life's second most exciting experiences. And, of course, the first most exciting experience is landing an airplane.
Fortunately, the Belite keeps the excitement level to a minimum. It lands in a manner very typical of any tail wheel airplane. A full stall landing, that is, touching down on the main wheels and the tail wheel simultaneously, is the best method to use and results in a low landing speed. Given even a modest headwind, your actual touch down speed may be matched by someone jogging down the runway. Due to the very light weight of the Belite, the airplane will decelerate rapidly after landing, especially if you make use of the brakes. The rudder will remain active until you are almost stopped. The heel brakes help with directional control; keep the airplane tracking straight.
Pre plan your traffic pattern. Ultralight aircraft will often fly a lower, close-in pattern. It may be on the opposite side of the airport pattern. Seek council of other experienced local pilots. Check with the airport manager. Be vigilant. Be prepared to give way to other aircraft, even if you have the right of way. Be especially watchful for wake turbulence. Fortunately, the Belite has excellent control authority.
Typically your approach begins when you are on the downwind leg, opposite your touch down point. Reduce power to the point that your descent matches any other light aircraft. Don't reduce power to idle, the descent will be very steep. (This can be done later, after you have appropriate experience and know your altitudes and airspeeds and descent paths.) As your turn base, use 1 notch of flaps and slow to about 50mph. Select a second notch after turning final, and adjust power to hit your touchdown point. Keep your airspeed at or above 45mph. Add power if you are low. Add a third notch of flaps when on short final, after the numbers are assured. Don't pull back on the stick to stretch a glide -- the aircraft will stall. Use power instead.
When you are over your landing point, at an altitude of 3 to 5 feet, level the plane off and reduce the remaining power. The Belite will settle towards the ground and decelerate. Just prior to touch down, pull the stick back to full flaw and touch down on all 3 wheels. (The Trike works the same way - pull back and let the plane settle on the two mains, try and make the tail 'kiss' the ground. Keep the stick back, whether in the Trike or the taildragger.)
If you want to be more conservative, and have the runway available, keep a little power throughout the flare. Reduce the power after touchdown.
The approach and landing can be made from a power off glide, but the descent angle will be very, very steep. By maintaining 45+mph (which you can do just by pushing the stick forward and the nose down) you will have plenty of energy for the flare. You can use a shot of power to clear obstacles. As a note of interest, the high angle of descent cause by idle power is caused by the windmilling propeller drag, not by the airframe. If you stop the prop, the Belite is a fine little glider, with an estimated glide ratio of 9+ to 1. Of course, a stopped prop is disquieting. Or perhaps, very quieting.
The use of approach speeds that are slower than 45 MPH is possible, but not recommended.
Emergency Procedures
As with all aircraft, you should be prepared for emergency situations. Preparation is key -- starting with your preflight. Are both mags working? Has the safety pin been removed from the parachute? Are the wing bolts latched properly? Are the flapersons properly connected? Has the fabric been torn? Is a wasp living in the wing spar? Is the pitot plugged? Are the tires properly inflated? Are the bolts tight? Are the winds acceptable? Are you prepared for the flight? Is the runup of the engine normal? What is the forecast? Will the winds turn? Does the flight have continuous emergency landing options? Does anyone know where you are going, and when you will return? These are just a few of the things on your checklist.
It is hard to separate good planning and caution from safety.
The Belite is available with or without electric start. If your engine quits, and you are unable to restart in flight, you will soon experience and unscheduled landing. First of all, you must fly the airplane. Lower the nose, maintain 45 to 50mph, and fly the airplane. Did I say, fly the airplane? The surprise of an engine stoppage causes some to forget to fly the airplane, which usually begins with a pitch forward (on the control stick) in order to maintain flying speed of 45+mph.
With the prop stopped, your glide ratio will be improve. From an altitude of 500 feet, you have a landing radius of up to a mile in any direction. Don't overshoot the landing. Use flaps as required. Use S turns as required.
The Belite carries a 5 gallon fuel supply, so be mindful of your available fuel. Given the approximate 1:20 to 2:00 fuel supply, you have plenty of fuel for fun, but must be extremely careful when planning cross country flights, especially with headwinds. A precautionary landing with the engine running (and I've done it) is a far safer option than letting a dead engine make the decision for you. Carry water, a cell phone, and perhaps, a personal locator, such as Spot. (And carry oil, for refueling at remote airports.)
Develop your flying skills. The Belite is truly a very high performance airplane -- it is capable of more responsiveness than almost all other FAR Part 103 ultralights. It is also capable of far more utility. Use your developed skills to improve safety. Fly within your personal limits provides the most fun with the least risk.
Enjoy your Belite!
Thursday, September 16, 2010
Flying the Belite Ultalight Aircraft - Part 2
Editor's note - this is Part 2 of our series on how to fly a Belite Ultralight Aircraft.
Climb
With the horizontal stabilizer trim set properly, the Belite will have a fairly neutral stick feel during climb. (If it doesn't, continue to fly the airplane, and trim the airplane after landing (or during cruise, if equipped with electric trim). As previously mentioned, a climb speed of 45 to 50 mph works well. Your rate of climb is dependent on many factors: weight, temperature, engine power, propeller pitch, etc., but will vary between 100 to 1000 fpm. In a brisk wind, the climb angle can seem quite dramatic. In fact, with a little headwind, an absolute altitude gain of 800 feet over a ground distance of 1/2 mile is achievable!
You will notice that the ailerons are light and responsive and the rudder coordination will be needed to offset P factor and adverse yaw. While the yaw effect caused by ailerons is not pronounced, application of the rudder in the same direction of the flaperons will result in nicely coordinated turns. (This becomes automatic after some flight time is accumulated.)
Belite's slip-skid indicator can help with rudder coordination, but I've learned to fly the aircraft with absolutely no instruments installed -- you can too, if you want.
The Belite ultralight aircraft is highly sensitive to angle of climb -- the plane will quickly slow down (and stall) if pulled up; conversely, a nose down attitude will result in a rapid airspeed increase and stall recovery. As you gain experience, you will wish to experiment with pitch control to get a better idea as to how the Belite relates to pitch versus airspeed changes.
By the time you are one hundred feet off the ground, you may notice that your aircraft has no doors. Even so, there is very little airflow in the cabin area and there is no sense of buffeting by air moving past the 'no doors'. Do not let the 'no door syndrome' distract you from flying your new ultralight airplane.
On your first flight, climb to a safe altitude and stay in the pattern. You may wish to circle the pattern several times before landing the Belite.
But before landing let's consider some flying basics.
Level Flight and Flight Maneuvers
Level flight can be determined by checking your altimeter and VSI, like any conventional aircraft, and adjusting stick and power to neutralize climb. Your indicated airspeed will settle in at 55mph (with a 28HP engine) to 62mph (with a 38HP engine) to 70+mph (with a 50HP engine, in experimental configuration). With the horizontal stabilizer properly trimmed, the control stick should have a neutral feel. Small pitch and power changes can be made to maintain level flight. A low horsepower engine will lose RPM and power quickly when the nose is raised. Conversely, it will gain RPM when the nose is lowered. Don't chase level flight -- trim your aircraft properly (either on the ground, with a fixed elevator tab, or in the air, with electric trim). Then set the power and let the airplane settle down, like any other airplane.
Turns in the Belite ultralight aircraft are made in the same manner as previously described in the 'climb' section. Remember to practice great rudder / aileron coordination. The rudder needs to be moved only when moving the ailerons. Once a turn is started, the airplane will continue to turn even if the controls are neutralized. Consequently, turns are stopped by applying a small amount of force in the opposite direction. Practice safety when turning: the excellent visibility of the Belite allows the pilot to look right, left, and backwards before a turn is started. You should even look overhead, which is easily done through the clear top windshield. This also allows you to see into a turn, as it is begun.
Always observe safe airspeeds: maintain Vx or higher (45 mph) in climb or slow flight, unless practicing stalls. The airplane will stall at approximately 28mph indicated airspeed, at sea level, when loaded with a 170 pound pilot, with full flaps, under standard atmospheric conditions. The airplane will stall at 34mph indicated airspeed, at sea level, when no flaps are selected.
Do not exceed 65mph, except in smooth air. Never exceed 80mph under any circumstances, it is the red line (Vne) of the airplane.
Once you are comfortable in level flight and turns, begin to practice flying at speeds that are less than normal cruise. Reduce power slightly and slow the plane to 45mph; this is a good to practice slow flight at. You will be able to maintain level flight at this power settings, although it may require some work.
If you add one notch of flaps, you'll notice that the nose of the airplane will immediately pitch down, but just slightly. You'll need to add some power to maintain level flight. With two notches of flaps, even more power will be necessary to maintain level flight. The last notch of flaps adds considerable drag, plus even more power. We don't recommend using this last notch of flaps, as it requires considerable power and slows the plane down rapidly, requiring a very steep approach angle when power is reduced.
For a normal approach, reduce power to about 65% and dial in one notch of flaps. This will place you in a normal approach configuration, with a normal approach path. Practice turns in this configuration. Also practice go-arounds by adding full power, slowly retracting flaps and establishing a normal climb. Learning how to go-around is important, as it gives you a safe plan should you reject a landing for any reason.
Stalls must also be practiced in the Belite, but they are predictable and gentle. Be sure to practice stalls at least 1000 feet above the ground. Start stalls with no flaps; reduce power to flight idle and set up a 45mph glide. Note the nose position; it will be low in order to maintain airspeed. Slowly raise the nose and observe the speed bleed off - this will happen quickly. There will be a slight shudder and the nose (and your seat) will drop as the stall occurs. Immediately and smoothly, push the stick forward and the plane will instantly start flying again -- it's easy! Then smoothly add power, and establish a proper climb. Clean up the flaps, climb back to altitude, and practice some more. Practice stalls with 0, 1, 2, and 3 notches of flaps, and with power off and with power on. Note the low kinetic energy, especially with 3 notches of flaps. In all cases of stall recovery, the nose must be lowered to the correct glide attitude as power is simultaneously applied. If flaps have been used in the sall, retract them slowly, and transition back to a climb attitude. Stall training is a great way to learn how the Belite is going to react during the flare to land.
Wednesday, September 15, 2010
Flying the Belite Ultalight Aircraft - Part 1
Editor's Note:
I recently returned from a heavy work schedule and from a great Alaskan vacation!
My last post was an excellent article by Earl Downs on the Belite. It provided a great view of the flying qualities of the Belite.
Many people want to know how to transition to flying a single place ultralight airplane, such as our Belite. This particular post will help you gain that knowledge! Although originally written years ago by another author, I have been graciously granted (anonymous) permission to update it to reflect our Belite ultralight aircraft.
Enjoy the reading.... Enjoy the learning... and enjoy the flying!
Published in three parts
Flying the Belite Ultralight Aircraft - Part 1
by James Wiebe, CEO
Belite Aircraft
General Flight Characteristics
The Belite 254 / Superlite / Trike (hereafter, collectively referred to simply as: 'Belite') is first and foremost, a very real airplane, requiring competent flying skills to takeoff, fly and land. In return, it offers a genuine flight experience, with none of the compromises associated with traditional ultralight aircraft and FAR Part 103 legal designs.
Most of the takeoff and landing comments below refer to the taildragger versions -- the Trike version is even easier to land.
The Belite utilizes a standard three axis flight control system consisting of flaperons (ailerons that also act as adjustable flaps, through the use of an ingenious flap / aileron mixer). It also has a conventional elevator and rudder.
The ailerons and elevator are operated by a conventional control stick, while the rudder are moved through the use of independent rudder peddles. Any pilot familiar with aircraft such as a standard Kitfox, Piper Cub (or common derivatives, such as the CubCrafter), or Aeronca Champ will find the cockpit to be a familiar and friendly environment. The flap function is provided by a four position flap lever that intermixes with the aileron control to 'droop' the flaperons.
Additionally, independent mechanical heel brakes are used to both stop and steer the Belite during ground operations. An optional electric elevator inflight trim system provides for completely neutral flight characteristics during cruise, allowing hands off operation for brief periods of time, such as when taking photographs. Back pressure is used on the stick in order to maintain a normal approach speed. All flight controls are lite and very responsive at all speeds.
(For an independent extensive flight review of the Belite, see the excellent article by Scott Severen, published elsewhere on this blog.)
The tail-wheel configuration of the Belite does not present any unusual challenges during takeoff or landing. The large rudder is very effective and little, if any, differential braking is needed to control the landing rollout. In fact, customers preferring to fly their aircraft without brakes will be comfortable, especially when operating off of grass airstrips with light crosswinds.
Absolutely no differential braking is needed on the takeoff roll due to excellent rudder effectiveness. Basic tail-wheel training in a Kitfox, Cub, Champ, Cessna 120/140, Citabria, or other tail-wheel light aircraft should serve to prepare you to handle the Belite. Differential braking works well to steer the Belite during tax and forward visibility on the ground is unrestricted. 'S' turns are generally unnecessary.
As with the operation of all airplanes, the pilot should be current and qualified. You should not attempt to fly the Belite unless you would feel absolutely comfortable soloing the airplane you have been flying for tail wheel proficiency. The EAA can provide help with transition instruction in a taildragger and with 'first flight' issues. You are encouraged to secure as many resources as possible to help with your transition.
Ground Handling
The Belite utilizes differential heel braking to maneuver the airplane. The heel brakes will cause the airplane to turn in the direction in which force is applied; left braking makes the plane turn left; right braking makes the plane turn right; braking both sides causes the plane to slow down.
Do not try to turn the airplane from a dead stop by locking a wheel and then adding power. The airplane will turn much more easily if the plane starts moving slowly first, then applying braking to the appropriate side. Once a turn is started, the momentum of the turn will tend to keep the turn going. Once you are taxiing, the rudder alone may be all that is needed to steer your Belite. As with all tail wheel airplanes, it is a good idea to center the tail wheel when you come to a stop. This practice will make it much easier to control when you start taxiing again, or when you start your takeoff roll.
There may be circumstances when taxiing in tall grass or on a soft surface that make it difficult to swing the tail when differential braking is applied. There is an old trick from the day of tailskids that may help out. If the tail wheel is really bogging down, add sufficient power to get the plane moving, then push the control stick forward (keeping the power up) and then apply brake and full rudder in the direction you wish to turn. The forward stick will lighten the load on the tail wheel and the rudder will help push the tail around. Be very careful when trying this, as you could blow a lot of dirt around or upset airplanes behind you. Always be courteous to other airplanes and pilots.
A note of caution: one must be very cautious when taxiing in windy conditions. The light weight and low wing loading of the Belite makes it susceptible to being upset by ground winds. Unless you have exception skills, fully understand the risks, and (perhaps) have wing walkers available, do not taxi your Belite in winds exceeding 12 knots (15 mph) or greater. Rapid ground turns should be avoided under all conditions.
Like any airplane, appropriate taxiing technique is important. The flight controls can be quite effective in helping the Belite ultralight aircraft safely taxi. When taxiing into a headwind, hold the control stick full back to help keep the tail on the ground. A tailwind requires to the stick full forward; this will help keep the tail on the ground. With the quartering headwind, move the control stick into the wind, as if trying to turn into the wind. With a quartering tailwind, move and hold the control stick away from the wind, as if trying to turn away from the wind. If the wind is straight over the nose or tail, keep the ailerons centered. These positions will help keep the wing from being lifted by the wind.
You should be completely comfortable with taxiing, braking, and turning before proceeding to takeoff. I say again: have total comfort with ground handling and taxi operations before proceeding to takeoff.
Take Off
Your first takeoff should be made from a runway that is both wide enough and long enough to accommodate errors. It should also be made from a runway without pressure from other aircraft operations. Do not make your first takeoff with space restrictions that require maximum performance. Perform a thorough preflight; make sure that the engine is warmed up and is showing correct temperatures, RPMs, mag checks, etc.
Align your Belite on the centerline of the runway and make sure the tail wheel is centered. With the brakes locked and control stick held fully back, smoothly increase the power to approximately 75% of full power. Release the brakes and continue to smoothly increase power to full throttle. You will immediately see that the rudder is fully effective; you can control direction by use of the rudder pedals. You won't need to use the brakes. Keep the ailerons (flaperons) centered. Directional control on the ground is controlled by your feet, not your hands.
Shortly after applying full power, you can push forward on the stick, and the tail will raise off the ground into a traditional level attitude. Keep the nose straight (using the rudder pedals), and as the speed passes 40 to 45mph, you'll be able to pull the stick back a little, and the airplane will fly. Depending on engine power, the total time from brake release to liftoff is about 5 or 6 seconds, depending on field elevation, winds, temperature, aircraft weight, and engine selection. In a strong breeze, a takeoff roll of well less than 100 feet is an easy matter.
Immediately at and after liftoff, the flaperons become very important. You'll use the control stick to level the wings. Concentrate on level wings and a slight climb attitude. I enjoy climbing to the top of ground effect (about 30 feet off the ground), then briefly leveling off and continuing climbout at a stabilized Vy speed, which is about 50mph.
As you gain more experience with the thoroughly enjoyable takeoff characteristics of the Belite, you will find that it also takes off very well in a three point attitude. The basic procedure is the same, but instead of pushing the control stick forward, you simply place the stick in a centered, neutral position. The Belite will fly off the ground when it is ready, in a tail low attitude. Make appropriate minor pitch adjustments as required to establish a climb.
Don't climb out too rapidly -- never climb out below Vx (about 40mph); if your density altitude is high, or your weight is heavy, your climbout speed should be at Vy or higher. Remember, you are flying the airplane.
Continue to Part 2 by clicking here
Thursday, September 2, 2010
What's an ATP Like Me Doing In a Belite?? By Earl Downs
Editor's Note: I've gotten to know Earl Downs, who used to help Skystar show and sell their Kitfox aircraft. (Earl's brother Ed was President of Skystar, maker of the original Kitfox Lite.) Recently, Earl had an opportunity fly both our ultralight aircraft Superlite Dragon, and our ultralight aircraft tricycle gear Belite, AKA the Trike.
Earl has authored over 80 articles for various publications, including Sport Pilot, Sport Aviation, and other magazines. Earl has written the following article for Belite, and I'm pleased to publish it here.
"What's an ATP Like Me Doing In a Belite??"
A Guest Blogpost for Belite Aircraft By Earl Downs
That’s right, I’ve been flying for 54 years and earned my airline transport pilot certificate 41 years ago. I’m still actively flying and flight instructing in all kinds of airplanes. So, it’s logical to ask, “Why is a licensed pilot like me flying an ultralight that does not even require the pilot to be certificated?” The simple answer is; I like the Belite because it’s fun and exciting to fly.
As it happens, I didn’t always have a passion for the ultralight style airplanes. When the ultralights first appeared in the late 1970s, I was one of those guys that said, “You must be crazy.” At that time, I was the manager of Boeing 707 and 727 pilot ground training for a large airline. However, when FAR 103 (the ultralight rules) was published in the early 1980s I was a little curious because the FAA was now involved.
In 1981 a couple of airline pilot friends of mine bought an MX II Quicksilver kit (that’s an ultralight style 2-place airplane) and built the plane under experimental-amateur built certification. I took them up on an offer to fly it and found a new way to “hang in the sky.” The early MX II did not fly much like a “real airplane,” but I got the hang of it and enjoyed it until the owners went their own ways and the MX II moved to another location. I wasn’t with the MX II for very long, but it changed my attitude about ultralight flying.
I was away from ultralights for about 15 years until I saw the KitFox Lite. It was an ultralight, but it had all the characteristics of a “real airplane.” I bought a kit in June of 2000 and it was flying in the spring of 2001. I loved my Lite! I found the controls harmonized perfectly; it flew with a light touch but was not “twitchy.” I cut a deal to lease my Lite to KitFox for use at airshows, and I would join their team to do the demo flying. I even found room for a 400 foot airstrip (Horse Apple Airfield) on my 10 acre homestead for backyard flying.
A few years ago I sold my Lite to move on to another project, and I was saddened when KitFox removed the Lite from their product line. Then, I heard that a guy in Wichita, Kansas had picked up the tooling and was going to produce the Lite again, under a new name, and with new improvements. As it turned out, James Wiebe not only had the tooling, he also had a background in a technology that could take this already proven ultralight in a new direction.
If the KitFox Lite had one challenge, it was to keep it light enough to meet the ultralight requirements of FAR 103. James’ unique expertise is in the area of lightweight composite materials, and he knew that carbon fiber was a key to opening up ways to bring more choices to the ultralight pilot. James formed the Belite Aircraft Company and used carbon fiber to expand the capabilities of an ultralight now named the Belite. New engine choices and construction features allow the Belite to be tailored to what the customer wants.
James invited to me fly a couple of his Belite airplanes, and I jumped at the chance to see what his company had done to my favorite airplane. A 2-hour 45-minute drive from my home in Cushing, Oklahoma led me to the production location on the northeast side of Wichita. The 2,600 foot long turf runway in the Kansas countryside is the perfect location for fun flying.
The first airplane I flew is the hotrod they call, “The Superlite Dragon.” (The paint scheme was inspired by dragons from the movie AVATAR -- Editors Note)
Equipped with a 50 HP Hirth twin cylinder, dual ignition engine, it still meets the FAR 103 requirements because of its use of weight-saving carbon fiber. Flying it was like flying my beloved KitFox Lite on steroids! Just like I remembered, the light controls were in perfect balance, but the short takeoff and rapid climb far exceeded that of my Lite. An experienced pilot will feel right at home in this ultralight hotrod, and a new pilot will find that a first flight in this little single-place plane is exciting but not intimidating. Even though it’s a taildragger, anyone with a few hours in a Cub or Champ will find it docile on the ground and in the takeoff and landing phases of flight.
The next plane I flew was the tricycle landing gear version of the beLite with the smaller 28 HP Hirth engine. To be honest, I expected the performance to be a bit “wimpy,” but I was pleasantly surprised. It demonstrated what I call, “good ultralight performance” combined with the excellent controllability of a “real airplane.”
Of course, the forward visibility on the ground is excellent and the takeoffs and landings are a typical tricycle gear non event. For pilots intimidated by taildraggers, it provides a better option with perfect ground and landing manners. It is also available with a larger engine.
The KitFox Light broke the code when it came to an ultralight that had the handling qualities of traditional airplanes. Through the use of modern technologies, the Belite Aircraft Company has expanded the versatility and capability of this captivating little airplane. All of this adds up to more flying for fun.
-- Earl Downs
Earl has authored over 80 articles for various publications, including Sport Pilot, Sport Aviation, and other magazines. Earl has written the following article for Belite, and I'm pleased to publish it here.
"What's an ATP Like Me Doing In a Belite??"
A Guest Blogpost for Belite Aircraft By Earl Downs
 |
| Earl Downs, in Baby Ace |
As it happens, I didn’t always have a passion for the ultralight style airplanes. When the ultralights first appeared in the late 1970s, I was one of those guys that said, “You must be crazy.” At that time, I was the manager of Boeing 707 and 727 pilot ground training for a large airline. However, when FAR 103 (the ultralight rules) was published in the early 1980s I was a little curious because the FAA was now involved.
In 1981 a couple of airline pilot friends of mine bought an MX II Quicksilver kit (that’s an ultralight style 2-place airplane) and built the plane under experimental-amateur built certification. I took them up on an offer to fly it and found a new way to “hang in the sky.” The early MX II did not fly much like a “real airplane,” but I got the hang of it and enjoyed it until the owners went their own ways and the MX II moved to another location. I wasn’t with the MX II for very long, but it changed my attitude about ultralight flying.
I was away from ultralights for about 15 years until I saw the KitFox Lite. It was an ultralight, but it had all the characteristics of a “real airplane.” I bought a kit in June of 2000 and it was flying in the spring of 2001. I loved my Lite! I found the controls harmonized perfectly; it flew with a light touch but was not “twitchy.” I cut a deal to lease my Lite to KitFox for use at airshows, and I would join their team to do the demo flying. I even found room for a 400 foot airstrip (Horse Apple Airfield) on my 10 acre homestead for backyard flying.
 |
| Earl Downs in his Kitfox Lite at Horse Apple Airfield -- 400 foot strip! |
A few years ago I sold my Lite to move on to another project, and I was saddened when KitFox removed the Lite from their product line. Then, I heard that a guy in Wichita, Kansas had picked up the tooling and was going to produce the Lite again, under a new name, and with new improvements. As it turned out, James Wiebe not only had the tooling, he also had a background in a technology that could take this already proven ultralight in a new direction.
If the KitFox Lite had one challenge, it was to keep it light enough to meet the ultralight requirements of FAR 103. James’ unique expertise is in the area of lightweight composite materials, and he knew that carbon fiber was a key to opening up ways to bring more choices to the ultralight pilot. James formed the Belite Aircraft Company and used carbon fiber to expand the capabilities of an ultralight now named the Belite. New engine choices and construction features allow the Belite to be tailored to what the customer wants.
James invited to me fly a couple of his Belite airplanes, and I jumped at the chance to see what his company had done to my favorite airplane. A 2-hour 45-minute drive from my home in Cushing, Oklahoma led me to the production location on the northeast side of Wichita. The 2,600 foot long turf runway in the Kansas countryside is the perfect location for fun flying.
The first airplane I flew is the hotrod they call, “The Superlite Dragon.” (The paint scheme was inspired by dragons from the movie AVATAR -- Editors Note)
 |
| Belite Superlite Dragon |
Equipped with a 50 HP Hirth twin cylinder, dual ignition engine, it still meets the FAR 103 requirements because of its use of weight-saving carbon fiber. Flying it was like flying my beloved KitFox Lite on steroids! Just like I remembered, the light controls were in perfect balance, but the short takeoff and rapid climb far exceeded that of my Lite. An experienced pilot will feel right at home in this ultralight hotrod, and a new pilot will find that a first flight in this little single-place plane is exciting but not intimidating. Even though it’s a taildragger, anyone with a few hours in a Cub or Champ will find it docile on the ground and in the takeoff and landing phases of flight.
The next plane I flew was the tricycle landing gear version of the beLite with the smaller 28 HP Hirth engine. To be honest, I expected the performance to be a bit “wimpy,” but I was pleasantly surprised. It demonstrated what I call, “good ultralight performance” combined with the excellent controllability of a “real airplane.”
 |
| Belite Trike Climbing Out |
The KitFox Light broke the code when it came to an ultralight that had the handling qualities of traditional airplanes. Through the use of modern technologies, the Belite Aircraft Company has expanded the versatility and capability of this captivating little airplane. All of this adds up to more flying for fun.
-- Earl Downs
Sunday, August 29, 2010
Another Saturday Breakfast Run
I enjoyed flying to Benton (Stearman Field) with Paul Fiebich for breakfast last Saturday. Great time! Here's some pics which Paul took of my yellow Belite Trike. I'll post some pics of Paul's airplane soon too.
And here's a pic that Paul took while I flew overhead. What was I doing? How was he holding the camera?
After Paul left, I did a quick two way run with my GPS in order to verify cruise speed. With a 28HP engine, this airplane trued at 56 mph. I thoroughly enjoy this plane. It's a very nice FAR Part 103 ultralight aircraft.
 |
| Belite Trike over nice house |
 |
| Belite on short final |
And here's a pic that Paul took while I flew overhead. What was I doing? How was he holding the camera?
 |
| Belite Fun Flying |
After Paul left, I did a quick two way run with my GPS in order to verify cruise speed. With a 28HP engine, this airplane trued at 56 mph. I thoroughly enjoy this plane. It's a very nice FAR Part 103 ultralight aircraft.
Tuesday, August 24, 2010
Stearman Field & the $100 Hamburger (make that a $1.50 hamburger)
Today's post is short and sweet -- just a little lunch time flying over to Stearman Field.
I can fly from my home base (Wichita Gliderport, home of Belite Aircraft) over to Stearman Field in about 5 minutes. As a result, it makes a great lunch destination, and I consume about a $1.50 of gas on the round trip in my ultralight aircraft. Awesome.
Stearman Field used to be Benton Airport. I paid it my first visit about 30 years ago, shortly after I got my private ticket and needed a plane to rent. It had a small dingy office, fuel for sale, and a mechanic somewhere in the shed in the back. The runway was lined with some homes.
That was then... today, Stearman Field is a busy place, with a new office/restaurant; an outdoor eating area, many new hangars, new homes, new runway extensions, instrument approach... the new owners have made a world of difference.
The restaurant is great -- providing a feel of flying nostalgia along with awesome greasy breakfasts and wonderful burgers for lunch. I've slipped in there several times in the last month. I managed to get over there before Oshkosh, and I had flown over in the yellow trike.

Here's a photo of the lunch counter, along with all the airplane nostalgia:

Nice, right?
Folks couldn't help but stop and look at the Cub Yellow Trike, and I took their pic from my dining table:

The Belite Trike is a great vehicle for taking in the local airstrips. It looks and flies like a real airplane, and it sure makes everyone stop and look at it.
You can read more about Stearman Field by clicking on this link.
You can read more about our Trike by clicking on this link.
Thank you, and enjoy your meal!
Monday, August 23, 2010
An Afternoon Flight with two Ultralight Aircraft
I gave Terry a call.
"Hi Terry,
I have to do a fuel consumption check on the Yellow Trike. If I fly over to your house, will you fly your Kitfox Lite and join me for some flying time?"
Terry answers:
"Yes, I have to check to see if the strip is mowed, but that should work fine."
I take off in my yellow Belite Trike and head over to Terry's strip, about a 20 minute flight to the east:

I'm soon over his strip, circling while he gets his plane ready for flight. I circle for 10 minutes while Terry unfolds the wings and gets his engine started. (He recently upgraded to the big 50HP Hirth).
I snap some pictures from my vantage point.

A couple of minutes later, Terry started his takeoff roll. I had a perfect view from on top, and I snapped several pictures of the ultralight aircraft shooting through the field. A wonderful view of Kansas aviation, a small plane rapidly accelerating through a hayfield:

And a moment later, Terry's Kitfox Lite was airborne.

And a moment later, the ultralight aircraft was over the end of the grass strip.

Terry climbed rapidly and joined formation with me. We made some turns, and took lots of pictures of each other. Although it was well over 90 degrees on the ground, the wind over my shoulders, and the coooler temperatures aloft, made for a very comfortable flight. Here's a pic of Terry, flying off my left wing:

I like that pic.
Terry is holding around 55% power to slow down with me. I'm holding about 90% power to keep up with him. (Terry's flying with a 50HP Hirth twin cylinder engine, I'm flying with a 28HP single lung Hirth engine.) Even so, we flit up to about 1500 feet AGL. The temperature is much nicer than on the ground; the air is reasonably calm, and it just feels good to be a pair of airplanes roaming around Kansas.
I don't know why, but Terry decides to fly his airplane through the struts of my airplane. I capture the event in a photograph:

More time passes, and I land. Terry greases a landing right after mine. Here he is on short final, having cleared the bean field in the background:

After carefully measuring my fuel consumption, I've got to put my yellow Belite Trike away in the hangar.

Terry and I talk for a few minutes. He takes off, and heads back home as well.

Wonderful flight. Thanks Terry, for flying with me.
-- James
"Hi Terry,
I have to do a fuel consumption check on the Yellow Trike. If I fly over to your house, will you fly your Kitfox Lite and join me for some flying time?"
Terry answers:
"Yes, I have to check to see if the strip is mowed, but that should work fine."
I take off in my yellow Belite Trike and head over to Terry's strip, about a 20 minute flight to the east:

I'm soon over his strip, circling while he gets his plane ready for flight. I circle for 10 minutes while Terry unfolds the wings and gets his engine started. (He recently upgraded to the big 50HP Hirth).
I snap some pictures from my vantage point.

A couple of minutes later, Terry started his takeoff roll. I had a perfect view from on top, and I snapped several pictures of the ultralight aircraft shooting through the field. A wonderful view of Kansas aviation, a small plane rapidly accelerating through a hayfield:

And a moment later, Terry's Kitfox Lite was airborne.

And a moment later, the ultralight aircraft was over the end of the grass strip.

Terry climbed rapidly and joined formation with me. We made some turns, and took lots of pictures of each other. Although it was well over 90 degrees on the ground, the wind over my shoulders, and the coooler temperatures aloft, made for a very comfortable flight. Here's a pic of Terry, flying off my left wing:

I like that pic.
Terry is holding around 55% power to slow down with me. I'm holding about 90% power to keep up with him. (Terry's flying with a 50HP Hirth twin cylinder engine, I'm flying with a 28HP single lung Hirth engine.) Even so, we flit up to about 1500 feet AGL. The temperature is much nicer than on the ground; the air is reasonably calm, and it just feels good to be a pair of airplanes roaming around Kansas.
I don't know why, but Terry decides to fly his airplane through the struts of my airplane. I capture the event in a photograph:

More time passes, and I land. Terry greases a landing right after mine. Here he is on short final, having cleared the bean field in the background:

After carefully measuring my fuel consumption, I've got to put my yellow Belite Trike away in the hangar.

Terry and I talk for a few minutes. He takes off, and heads back home as well.
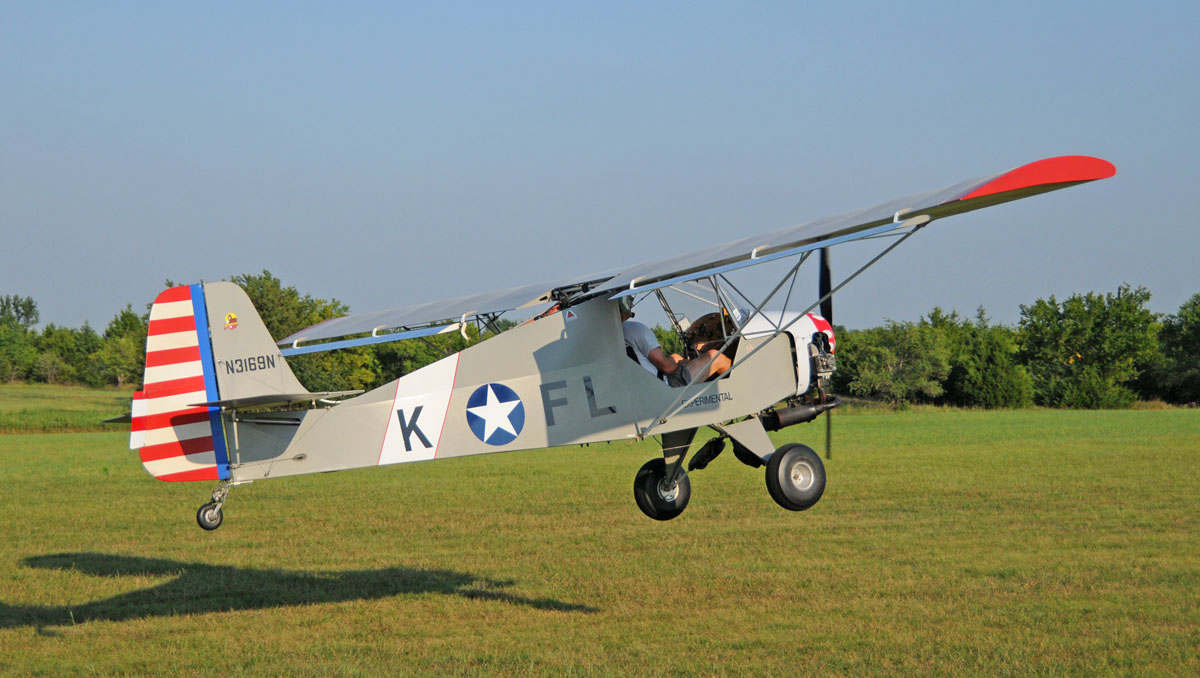
Wonderful flight. Thanks Terry, for flying with me.
-- James
Monday, August 9, 2010
Ultralight Aircraft for sale: Belite Superlite Dragon

HI!
This post receives bazillions of hits for people looking to buy a Belite or other brand of ultralight aircraft. This particular aircraft was sold a long time ago. We're always making more... we've upgraded the design... we're now using four stroke engines... contact us to check current inventory or to discuss what exactly you want to buy. Check out our "UltraCub", check out our four stroke engine options. You can find our webpage at www.beliteaircraft.com
And you can always find my latest blog post at jameswiebe.blogspot.com
Here is the original post:
Ultralight Aircraft FOR SALE: Belite Superlite Dragon
Winner – 2010 Sun N Fun Grand Champion Ultralight Aircraft
Featuring 50HP (derated to 38HP for FAR Part 103 compliance) engine, carbon fiber spars, chute, floats and much more…
Would be perfect aircraft for heavy pilot loads or high altitudes or float plane or anyone who wants the best ultralight. It is offered on wheels or floats.
Equipment list:
Base Aircraft $24,995 (tons of basic features in the base aircraft)
OPTIONS:
Carbon Fiber Spars & Ribs 2,200
Powdercoating 595
Machined Aluminum Disc Brakes 400
Landing Gear Spring Gear Upgrade 350
Larger Flaperons 200
F23 50HP dual ignition engine upgrade 2,760
Upgrade to Belite Avionics instruments 100
Install fuel sender in fuel tank 200
Recovery parachute, rated 550 pounds 2,300
Dragon paint scheme 4,000
Carbon Fiber Cockpit 400
Composite tail spring upgrade 100
Vortex Generators 200
Float Kit Hardpoints N/C
TOTAL ON WHEELS…. $39,000
Floats $ 3,995
TOTAL ON FLOATS … $42,995
This aircraft is superb in all respects. It even comes on wheels or on floats, take your pick! This plane has been seen flying by thousands of pilots. It won the Sun N Fun Grand Champion Ultralight Aircraft award.
Call or email James if interested: james@beliteaircraft.com or 316 393 5477.

Subscribe to:
Posts (Atom)