Saturday, January 8, 2022

Details on Ultralight Honeycomb Cabin

I'm now 34 hours into the build of a Chipper ProCub / UltraCub 2022 prototype aircraft. The design has the following characteristics:
  • Safety first, with an enclosed robust cabin
  • Compliant with FAR Part 103
  •     - single seat
  •     - empty weight of 254 pounds
  •     - stall speed of 28 mph or less
  •     - full power cruise speed of no greater than 62 mph
  •     - maximum fuel capacity of 5 gallons
  • Easy to build
  • Classic good looks, unapologetically an airplane 
  • Inexpensive
  • Quick building
  • Folding wings
  • Fantastic flying manners
  • STOL capability is a plus.
 A shoutout to my friend Landon!, who painted the seat in the photo. This seat was made for and first flown in my skydock design, and it looks great with the old Belite logo and gloss blue color. Everytime I do work on an ultralight, I find this seat and set it in the design to see how things are shaping up. I do have a list of brief skydock videos,


but I digress. Back to the business at hand. Here's the visual progress report on this Saturday:


Below is a closeup on that seat. It is resting on two honeycomb bulkheads, along with the backrest honeycomb cross piece. The honeycomb has been cleaned up with an aluminum cap on the heavier 3/4" rear bottom honeycomb and backrest cross piece. The front cross piece has a vinyl cap. Look carefully into the small 'windows' in the sides of the cabin, and you can see where I've begun to install aluminum tape over exposed honeycomb.


Another photographic point of view. The cabin is currently in 'flintstone' mode as the bottom skins aren't yet installed.


Yesterday, I designed a couple of new gussets for the top of the cabin. They are highlighted in green:


Today, I cut them on the shopbot and installed them. Here's the forward gusset. You can see the mirror part on the opposite side of the cabin as well. I pre-primed them before I installed them. The tab is intentionally overbent to keep the sharp edge away from the pilot-occupant.


For that matter, all of the gussets are bent with safety in mind. The tabs almost always face away from the occupant.

I already mentioned the backrest cross support piece. It is fabricated from 3/4" honeycomb, and then held in place by pairs of aluminum angles which were bonded using epoxy. I prefer 3m 2216, but I had original formula JB Weld on hand, so I used it.


The photo shows the parts bonded together and held with temporary bolts. As the rear fuselage side skin is not yet installed, these bolts will eventually be replaced and redone with washers along normal practice lines.


Changing my focus to the front box, I'm really pleased with the quality of the CNC parts; the general fit, and the way this is beginning to look. I'm excited for how things will be when the windshield and engine cowl are added. I'm designing a new cowl which reflects the fresh new look of this airplane; I won't be using the old radial bump design anymore.


I mentioned earlier that the cabin was still in flintstone mode (no bottom skin yet); these photos show the detail of the structure as seen from the bottom.


Make sure you've seen my youtube videos which show this evolving project:

This one talks about adding metal skin to the rear fuselage in CAD:

This one talks about using Sketchup to make this design:

Finally, as I am in bootstrap mode, I get a lot of enthusiasm and deeply appreciate my patrons. $10 per month gives you the rights to the blueprints for this plane (terms and conditions apply) and $35 per month indicates that you plan to purchase a kit. $80 indicates that you plan to purchase a Ready To Fly; I've set the price for the first 3 RTF planes at $30,000 in taildragger configuration and basic instrumentation.

Become a patron here:

www.patreon.com/jameswiebe

Thanks for reading,


P.S., this is how the cabin CAD looked on December 12, a little less than one month ago. It's come a long way!


Wednesday, January 5, 2022

Honeycomb Ultralight Cabin

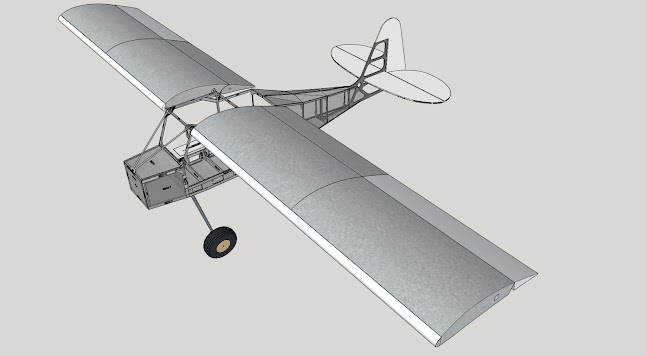
The last two days have been spent starting to put together my ultralight kit aircraft. I'm pleased with my progress; I currently have 19 hours in the build. When finished, my Chipper UltraCub will look a lot like this:

Yeah, you have to use some imagination to make that real plane. An engine would help. Also, a propeller, a windshield, a coat of paint, and some control systems.

My efforts this week are focused on the cabin and rear fuselage. Drum roll, please... here's some photos at the end of today, Wednesday.

What you are looking at is a cabin which is very similar to earlier ProCubs and UltraCubs from Belite Aircraft. Structurally, it is built from honeycomb aluminum and a lot of sheet metal.  The honeycomb is used very smartly, using pre-cut strips, so very little is wasted.

I am providing the plans for this ultralight to my Patreon subscribers for $10 / month. Terms & Conditions apply.  Here's the link: www.patreon.com/jameswiebe  You can also indicate your desire to purchase a kit for $35 / month. I need the support, and I appreciate it very much.

Looking inside the cabin from the rear, here's the view:


And here's another view.


The main idea in this design is to surround the pilot with a cage, constructured of honeycomb and extruded aluminum, so that the occupant is well protected in the event of an accident. The size features are similar to my past commercial designs, a tall person will fit well, and a big person will fit as well. 

The exterior width is 25", and I am 6' 2"+. 

For example, the firewall frame is constructed from 3/4" thick honeycomb. These pieces are brute strong, yet very light. This is 12 ounces of honeycomb:


I used my shopbot to cut various gussets, providing exact fit and awesome quality. Here's some samples.


The most impressive gusset so far in this project is the side gusset. It ties together the forward cabin, a lot of honeycomb, and the rear fuselage while weight very little and providing predrilled holes for easy assembly. It's nice.


I'm also using stock aluminum structural angle, which requires hand drilling. Here, I've marked a part with a drill pattern.

You can see that part attached to a bulkhead, in the below photo. Also note how my predrilled angles have been used to attach the bulkhead to side honeycomb.


As I indicated before, I am providing the plans for this ultralight design to my Patreon subscribers for $10 / month. Terms & Conditions apply.  Here's the link: www.patreon.com/jameswiebe  You can also indicate your desire to purchase a kit for $35 / month. I need your patreon support, and I appreciate it very much!!!

The most requested feature is folding wings. Naturally, this design has wings that fold.


Monday, December 27, 2021

Service Bulletin #5 Correct Wheel Alignment

 Service Bulletin #5 Correct Wheel Alignment

This SB #5 is advisory in nature.

When assembling landing gear, particularly wheel assembly, take care to ensure that alignment of the wheels is correct. The lineup of the wheel should be straight to ground travel path; toe-in and toe-out must be avoided. Toe-in will cause landing gear chatter.

Alignment is ensured by correct rotation of the landing gear shaft before pinning in place at the upper bulkhead fitting.

The following picture shows correct alignment. The green line denotes the vector of the ground roll relative to the tire.


The following picture shows incorrect alignment, which causes minor to severe gear chatter on takeoff and landing. The orange line is as incorrectly assembled; the green line is what it must be reset to.


Tuesday, December 21, 2021

James launches a Podcast!

In this age of social media, I'm loving the way that I can connect my passion for aircraft with you!

I've been doing this in multiple ways: this blog, Facebook, email communication, patreon, Youtube, instagram, and now... drum roll please... an occasional podcast.

Well, it's really more like a video podcast. 

In yesterday's very first episode, I explain some of the design decisions behind the Chipper ProCub / UltraCub, along with a tour of some of the FAR Part 103 features that the design has.

You can see and hear it on YouTube, here:

https://youtu.be/iBtjWFirmBA

You also get to see my messy office.

I'm looking for ideas of topics you'd like me to cover. I'm looking for feedback on how to as interesting as I can for you!