Monday, December 10, 2012

Belite Aluminum Ultralight Aircraft Cabin Construction, #1

Please note: James' blog has moved to a Wordpress site. To access it, please visit http://jameswiebe.wordpress.com/. All posts have been transferred to the new site, and all new posts will only be accessible via Wordpress. Thank you for your interest!


THIS IS PART 1 IN THE CABIN ASSEMBLY SERIES.

Part 2 may be found HERE (click).
Part 3 may be found HERE (click).

Let's dig into building an aluminum cabin for a Belite Ultralight Airplane.

Sometimes, it's good to have a vision of where we are trying to get, and in our case, it is represented by the following photo:

Belite Aluminum Cabin for ultralight airplane


Here's the ground rules:

a. 99.97% of all holes are pre-drilled.  There are a few you have to drill, for reasons which are usually obvious.  You'll have to drill into the matching longerons and tubings, and this is very easy because it matches to the holes in the gussets.
b.  Every piece of aluminum gusset is pre-cut and pre-drilled on our CNC machinery.  The accuracy is amazing.
c.  You are responsible for cutting and fitting aluminum longerons (all metal square tubing and angle material) to length.  This is easily done on a bandsaw or a tablesaw, but if you use a tablesaw, you must use a carbide blade.  Wear eye protection.
d.  Make sure you clean and deburr all components.  I will never bring this up again in this document, but you will see plenty of evidence of deburring in the photos.
e.  A few clecos go a long ways.  I also like to use cleco clamps.  We buy them for $4.95 / dozen in Wichita, and you can do the entire airplane with a hundred or so.  Two hundred would be a little better.
f.  We include some 1/8" rivets in the kit to get you going.  We don't include 3/16" rivets.  Our rivets are aluminum / steel commercial quality rivets.  You may wish to upgrade to aircraft grade rivets.  In certain locations, you may wish to buck solid rivets.  Always make sure you use the appropriate length of rivet.
g.  All holes in the pre-drilled gussets are 1/8" in diameter, but many of the holes will be drilled out for use with 3/16" rivets.  Examine the construction photos for advice.
h.  Don't get ahead of the pictures.  Don't drill out if it's not drilled out in the photo; don't rivet if it's not riveted in the photos.   Having said this, there are still a few spots where you'll have to drill out rivets after they've been pulled.
i.  Make sure you get everything square.  There are not many places to screw up, but a good example is the second step, where the front left and right parts are clamped on.  Make sure they are exactly matched to the front of the firewall frame.  Check squareness.  Build on a dead flat table.  Use sharp drills.  Go slowly.
j.  Read and understand all of these instructions before doing anything.


1.  Firewall Frame.  Cut the Firewall Frame from 7075T6 angle aluminum, with 45degree mitred corners.  Temporarily Cleco with corner gussets (also 7075T6 aluminum). Drill out and assemble using 3/16 rivets.

Firewall Frame for Belite Ultralight Aircraft

2.  Clamp Front Left and Right Master Gusset.
Clamp on Front Left and Right Master Gusset. 

3.  Clamp on Left and Right Longerons.  These are approximate 60" in length.  They are 2024T3 aluminum, with dimensions of 0.875 x 0.500 x 0.063".  Other than the firewall, this is the only angle aluminum used in our cabin, and we will call it "structural angle" hereafter.

Clamp on Left and Right Longerons.
They are butt jointed on the inside, as shown in the photo below.
Butt joint of Longeron.
3.  Cut two pieces of structural angle to 16.25" in length.  Clamp and cleco in place.

Two pieces of structural aluminum, cut to 16.25" in length
16.25" structural angle clamped and clecoed in place.
4.  Clamp on Front Top and Bottom Master Gussets; also vertical longerons.

Front Top and Bottom Master Gussets.  Bottom is slightly longer as seen in above photo.
The Vertical Longerons are 40" in length.  They are cut from structural aluminum.
Vertical Longerons are 40" in length.
Front Top Master Gusset clamped in place.  Your gusset may be pre-notched.
Vertical Longeron clamped in place.
Butt joint on bottom of Vertical Longeron.
Vertical Longeron clamped in place.
Use a Sharpie and make a mark on each Vertical Longeron, through the hole in the photo below:

Marking dot thru hole onto Vertical Longeron.
You must make a V cut in each Vertical Longeron at the marked location.  The V cut must be larger than necessary, as it is impossible to unbend and rebend it, because the metal will fail in fatigue in two bends.

(Multiple overlapping gussets carry all flight loads at this spot, but its nice to have the Vertical Longeron holding together).
Make a V cut in each Vertical Longeron at marked location.
Then reclamp the Vertical Longerons in place.

5.  Cut and fit Diagonal Longerons from Structural Angle.

You need to cut and fit two Diagonal Longerons from Structural Angle.
Diagonal Longerons cut from Structural Angle.
Diagonal Longerons being fitted to Front Left and Right Master Gussets.
Butt joint on Diagonal Longerons.
6.  Cleco in doubler gussets on Front Top Master Gusset.

The doubler gusset is inserted into the cleco assembly at each front top corner.

Doubler Gusset added to Front Top Master Gusset.
7.  Clamp on Front Bottom Master Gusset.

Front Bottom Master Gusset being clamped in place.
Marking position of notch in Left and Right Longerons.
You'll need to make a notch in the Left and Right Longerons at the marked spot, which is displaced 1/8" from the edge of the Vertical Longeron.
Notch made in Left and RIght Longerons, displaced 1/8" from alignment mark.
After the notch is made on each longeron, it's an easy matter to pull in the two longerons. using clamps or weights:
Left and Right Longerons pulled in
A piece of 3/4" thin wall square tubing is cut to 23 3/4"+.  After trimming to the correct length, it is clamped to the Front Top Master Gusset.

Clamping in square tubing
8.  Build up the First Cross Box.

It's built from two gussets (First Cross Box Front and Rear), along with dual matching lengths of 3/4" thinwall aluminum tubing.

First Cross Box being built.
First Cross Box, view from front.
That ends our first installment on how to build a Belite Aluminum Cabin.  We'll pick it up again in a few days.


Sunday, December 9, 2012

Well Coordinated Flight in UltraCub with 4 Stroke

Please note: James' blog has moved to a Wordpress site. To access it, please visit http://jameswiebe.wordpress.com/. All posts have been transferred to the new site, and all new posts will only be accessible via Wordpress. Thank you for your interest!


I'm able to fly the 4 stroke UltraCub with good turn / rudder coordination, without using the rudder pedals.  This fact is shown in the following video on youtube:

CLICK HERE

What this means is the Belite's aircraft continue to be more like flying a Cessna 172.

The UltraCub has enhanced span and enhanced flaperons.

And here's a photo of a cabin from an UltraCub, nearly complete, ready to cover:

UltraCub Cabin under construction

Friday, December 7, 2012

Testing Continues on Belite 4 Stroke Ultralight Aircraft

Please note: James' blog has moved to a Wordpress site. To access it, please visit http://jameswiebe.wordpress.com/. All posts have been transferred to the new site, and all new posts will only be accessible via Wordpress. Thank you for your interest!


Belite UltraCub, Sans turtledeck... with 4 stroke engine
The testing of this new airplane / engine combination has been just been fun.

As this is just Part 103, I'm not required to keep a log, but I wish I would have.  Here's a recap of the experience so far.

#1 -- This flight got the plane long enough to prove that a nose forward CG was a disaster.  Got into ground effect; immediately reduced power; was unable to flare nose up; tested the landing gear.  All good.

#2 -- Reset the elevator  more incidence down.  Improvements over #1.

#3 -- Rebuilt engine mount, changed CG substantially, much improvement.  Several test hops.

#4 -- Reset elevator authority movement with more "up". Landings are now pleasant.

(time in aircraft is now perhaps totalling 24 minutes, 0.3; -- not much)

#5 -- Aircraft is now showing good elevator authority; I choose to fly the plane around the pattern.  No problems.  TT [total time] now 0.5 hours

#6 -- one hour flight.  TT now 1.5

#7 -- one hour flight.  Testing to date includes rudder, flaperon and elevator authority; rudderless turn coordination; turns of 45 degrees+, takeoffs, landings; stall attempts; turns about a point.  Recorded and uploaded to youtube.  TT now 2.5

#8 -- thirty minute flight.  Testing includes:  takeoff and climb to approximate 1000'++ AGL (taking approximately 140 seconds as seen on video); 14 knot headwind on ground without difficulty during taxi, takeoff and landing; many takeoffs and landings demonstrating ground rolls of 40' or less into wind (you can see this on video); calibration of RPM for various flight conditions; continued evaluation of fuel flow.  TT now 3.0 on aircraft. Video uploaded to youtube, and it is available for viewing HERE.  Note how the plane always floats down the runway; I've got too much approach speed.

Suggested RPM for 45HP 1/2VW engine with a 58x22 propeller are:

* full power producing 2900 - 3150 RPM for takeoff  (redline is 3600)
* 2400 - 2700 RPM for cruise
* 1800 - 2050 RPM for final descent


Wednesday, December 5, 2012

Belite Ultralight Aircraft 4 Stroke Update

Please note: James' blog has moved to a Wordpress site. To access it, please visit http://jameswiebe.wordpress.com/. All posts have been transferred to the new site, and all new posts will only be accessible via Wordpress. Thank you for your interest!


1.  INTRODUCTION -- THE VIDEO

I've posted a video on youtube of a test flight of a Belite ultralight aircraft, with a strong running, reliable four stroke engine.  The video is HERE.  Caveat:  It's long, has some boring parts, and is filled with flying on a beautiful Kansas day.

The aircraft in the video is a Belite UltraCub, and it is available in kit form or fully assembled from Belite.  When the tail turtledeck (fairing) is installed, it looks like a classic J3 cub.  (Rummage through our Belite website or Belite UltraCub flickr photo site and you can find lots of photos of it with the turtledeck attached.)

You might want to watch the video if:

a)  you are interested in flying on approximately 1.7 gallons gasoline per hour (91 octane or 100LL) without having to hassle with mixing oil
b)  you'd enjoy purchasing a kit that starts at just $6995 (less engine) (until our current special expires).
c)  you appreciate the value of a beautifully engineered aluminum airframe, comparable in many respects to kits and factory assembled aircraft costing ... a LOT more.
d)  You'd like to fly without FAA registration, without medical, without a pilot's license (but with pilot skills) appeals to you.  This airplane will do it, with a flying weight of 278 pounds (including parachute).  (That's the maximum allowed under FAR Part 103).  (Weights vary by option; this is with heavy spars and ribs; so you can do better)
e)  You'd like to fly with an engine that's been proven in aircraft use for many years, weighs 88 pounds, has dual ignition, and develops 45 HP, and can be built from a kit, or purchased fully assembled, or scratch built from VW parts.
f)  The idea of flying a small aircraft that has well mannered controls appeals to you -- it can be flown without feet on the rudder pedals (and I'll be posting a video showing that sometime very soon).

2.  THE GORGEOUS ALUMINUM CABIN which forms the foundation of our product

Here's are pictures of the aluminum fuselage cabin in our UltraCub, constructed from a variety of aluminum, including aerospace 7075; 2024; and 6061T6:

Quartering rear view of the Belite Ultralight Airplane (UltraCub) cabin

Top Sunroof aluminum skin -- that's 7075T6 aluminum!

View of the inside of the cabin.  Divider panels are for small baggage compartments.

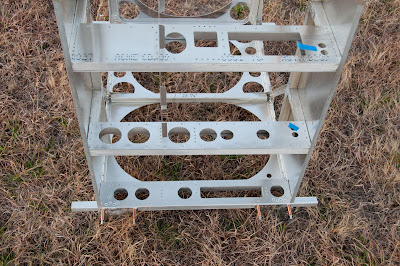
Bottom of the fuselage cabin.  Box beams.  Phenomenal strength.

Kansas sunlight, a cabin, and shadows.
When you order our kits, all of the cabin panel skins and gussets come CNC cut and are 99.95% predrilled.  Everything matches up.  You are responsible for cutting the aluminum tubes and matching them to the skins, then riveting.  Since every single dimensional corner in the cabin has a matching premachined, predrilled gusset, we've made it hard to screw up.  Jigs are irrelevant. 

3.  WHAT DID I DO ON TODAY'S FLIGHT?

Here's what I did on today's test flight:

a)  takeoffs
b)  landings
c)  investigation of aileron / flaperon authority
d)  elevator control
e)  stalls (couldn't really get it to stall)
f)  approach speeds
g)  fuel flow analysis (burned about 1.7 gallons in 1 hour -- will be working on refining this number) (should be good for 3 hours of cruise flight)
h)  steep turns
i)  climbs
j)  power off descent
k) brief formation flight with a RANS SII Coyote -- thanks Mike :-)
l)  waved my hand out the cockpit at the camera

Most of this made it onto the video, but not all.  Please watch for me waving my hand out of the cockpit.

4.  WHAT HAVE I LEARNED ABOUT THE ULTRACUB?

Some very interesting points to consider:

a)  it turns without using the rudder pedals.  (It's not such a 'rudder airplane' as prior Belite aircraft.)
b)  The ground run is short and it climbs like crazy
c)  it sounds cool -- very nice airport wow factor
d)  the engine still isn't developing anywhere near full power.  We've got it turning 3125 RPM with our selected prop, yet max power is available at 3600 RPM, should we choose to re-pitch the prop.  But why?  the airplane is probably flying at Part 103 max speed, as is.  TBD.
e)  it is the most fun I've had flying a Belite.
f)  it has several baggage and map compartments (you can see them in the cabin photos)
g) the riveted aluminum structure is easier to check and repair (welded aluminum requires much more vigilance against cracking in the welds.

5.  WHAT SECRET DESIGN FEATURES DOES IT HAVE?

a)  The Burgundy ultracub is an ultralight airplane, flying under part 103.  Getting weight down was a real problem, because the cabin in the Burgundy plane had a lot of goofs, requiring the use of extra metal to fix.  I was determined to meet weight requirements, so I used a hand toss parachute with a weight of 7.5 pounds (not yet installed, but it showed up and will be installed very soon).  (Max weight with parachute is 278 pounds; if we put it on floats, max weight is 338 pounds).  I also calculated weight with just one quart of oil, although the engine is flying on two quarts.  It has a few other weight saving tricks, which will remain secret for now.  Such as titanium axles, a composite tailspring, thinner polycarbonate windshield, and smaller wheels.

b)  After the flight test sequence is completed, the cabin in the Burgundy plane will be replaced with a new cab, just like the photos above.  This will cut the weight some more, and allow me to reclaim my titanium axles.

c)  I was determined to make weight with brakes and steel springs, because most people want them.  But if you don't, the plane is even lighter.

d)  The engine mount is radically small and light.

e)  The flaperons are full span.  This increased wing area, decreased stall, and probably aided the snappy turn characteristics which this plane has.  This is our first aircraft with full span flaperons.  They have 4 attachment points per wing.  All older Belite flaperons had 3.  

f) The wings are plain old aluminum spars + baltic birch plywood ribs.  Inexpensive.  Switching to carbon fiber spars and aluminum ribs would save even more weight.

g)  The wingspan was enhanced by about 4 inches, by widening the cabin wing attach points.  This increased effective lift as well, and also makes the wings easier to fold.

h)  The earlier version of this plane had winglets.  They've been deleted.

i)  The wing area is now around 112 square feet.

j)  Although we are hand-propping the engine, you could use an electric starter, but it would cost a lot of weight.  You'd have to register experimental, or buy all the weight saving options (carbon fiber spars) in order to legally comply with Part 103 weight requirements.  The engine is easy to start.

6.  WHAT ABOUT THAT ENGINE?

1/2VW on Belite Ultralight Aircraft
Well, it's a 1/2VW with dual ignition, and they've been around for years.  We hadn't tried one because we couldn't get the weight of our plane down enough, but with our new aluminum cabin design, we can finally do it without resorting to exotic materials such as carbon fiber spars.

It comes from Scott Casler at Hummel Engines, and it is a very impressive product.  We bought the top of the line with 45HP and Nicosil cylinders, but a lower HP solution will work fine.

You can also get kits for a very similar engine from Great Plains Aircraft, or you can make one yourself from readily available plans.

Our engine mount is totally custom, and the magneto sticks into the top of the front cabin.  We'll accomodate this with a hole in the firewall.

7.  WHERE TO NOW?

I'll be traveling on business for much of the next two weeks, but I've already taken many photos of the cabin production procedure, and I plan to get that posted.

The airplane is running so well, flying so nicely, that I'm hoping (weather permitting) to take it on a nice cross-country flight sometime in December.

I'm eager to fly it again.  

Ultralight Airplane with 4 Stroke Engine -- Takeoff!