Tuesday, April 3, 2012

Incredible paint job on new Belite

Please note: James' blog has moved to a Wordpress site. To access it, please visit http://jameswiebe.wordpress.com/. All posts have been transferred to the new site, and all new posts will only be accessible via Wordpress. Thank you for your interest!


I've just loaded about 30 hi res pics to Flickr of a new customer airplane.  You can see them on our Flickr channel, here.

This is such a nice plane!

Turqoise Belite Ultralight Airplane
It was built with nearly every option -- from a nice instrument panel to a big 50HP Hirth.  It has carbon fiber spars, an aerodynamic tail, a rescue chute, and much more.

It meets Part 103, weighing in at 275.4 pounds.  (Limit is 278.)

Here's a front on view, showing off the engine:

Front view of Belite Ultralight Airplane, with 50HP Hirth

And here's how Belite Electronics look, in the panel.

Instrument panel in Belite ultralight airplane


This plane even has strobes and position lights:

Strobe and Nav lights on Belite ultralight airplane
The interior pilot seat looks very sharp.  We haven't yet put the carpet on the floor, but that's coming too.

Interior of Belite ultralight airplane

There are many, many more photos showing all kinds of details of this airplane on Flickr.  Have a look.  Let me know what you think.

Sunday, April 1, 2012

How to attach a rear fuselage to a cabin on an ultralight airplane

Please note: James' blog has moved to a Wordpress site. To access it, please visit http://jameswiebe.wordpress.com/. All posts have been transferred to the new site, and all new posts will only be accessible via Wordpress. Thank you for your interest!


I occasionally publish portions of the Belite assembly manual, which will help you build your very own ultralight airplane.   Here we go with another installment:

Mating the Rear Fuselage to the pre-welded Aluminum cabin

In this section, you are going to mate your rear riveted aluminum fuselage to the cabin.  This is done by leveling both sections very carefully, trimming the length of the aluminum longerons on the rear, and then riveting on gussets.

This isn’t too tough to do, let’s get going!

1.      Level the cabin and the rear fuselage.  Using blocks and a level, ensure that the top of the cabin is level.  Although only one level is used in the photo, make sure it is also level side to side.

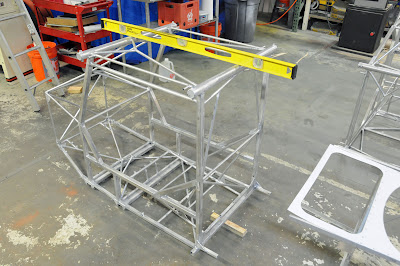
Figure 1 -- Level the cabin
You’ll notice the small stubs pointing backwards on the photo above, along the bottom of the fuselage.  Current production cabins no longer have the stubs.  

Figure 2 -- Level the rear fuselage

2.      Trim the longerons on the rear fuselage.

All four of the rear fuselage longerons are trimmed butt flush to the cabin.  Also, the top skin will need some trimming to make it fit.

Belite -- Reserve Grand Champion Ultralight at Sun N Fun 2012

Please note: James' blog has moved to a Wordpress site. To access it, please visit http://jameswiebe.wordpress.com/. All posts have been transferred to the new site, and all new posts will only be accessible via Wordpress. Thank you for your interest!


YES, we did win the Reserve Grand Champion ultralight aircraft award at Sun N Fun 2012.

3rd year in a row with a major award for Belite.

Thanks to Mike R. for doing the vast majority of the work and providing zillions of great ideas on this award winning airplane.!

Thursday, March 29, 2012

Really Cool WoW Plane Photos

Please note: James' blog has moved to a Wordpress site. To access it, please visit http://jameswiebe.wordpress.com/. All posts have been transferred to the new site, and all new posts will only be accessible via Wordpress. Thank you for your interest!


I've just got pictures today.  Here's some more photos Gene took today at Sun N Fun 2012:

Blue Skies, Belite Ultralight Airplane

Severe Climb Angle? with Belite Ultralight Airplane