Our
Belite Electronics are keeping me running, just catching up with orders. (And no, we're not caught up with orders. Not yet, anyway....)
One of the more popular products is the
Belite Fuel Gauge.
Types of Belite Fuel Gauges
It's available in a version compatible with standard 2.25 inch instrument cutouts ($74.95):
 |
| Fuel Gauge from Belite with 2.25 inch round bezel |
It's available in an ultralight version with dimensions of 1.75 x 1.75 inches (and a weight of about 15 grams) ($69.95):
 |
| Fuel Gauge from Belite with 1.75 inch square bezel |
The electronic design of each of these products is identical; the only difference is the bezel size and dimension. They are designed to attach to a "capacitive fuel gauge", which is available from us and from several other vendors in varying lengths. (No secret here: we use one manufactured by Falcon Gauge.) Here's what a "capacitive fuel gauge" looks like ($99.95):
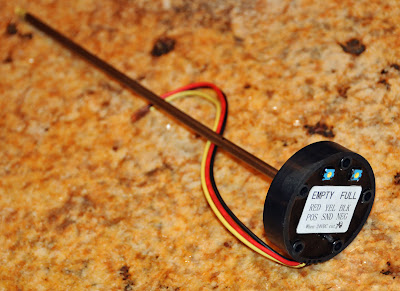 |
| Capacitive Fuel Probe, 12 inch length. |
The probe has no moving parts whatsoever. It senses the fuel level by the electronic effect of increasing or decreasing capacitance. But, as they say in the movies, that's not important now. The only thing you need to understand is that the probe outputs a voltage level that exactly correlates with fuel level in the fuel tank. The voltage varies between 0 volts (empty tank) and 5 volts (full tank.)
Installing the Fuel Gauge and Fuel Probe in your airplane
Hooking these things together is not difficult! Basically, this is what you need to do:
1) Install the Fuel Gauge in the panel. 2 screws and a hole in your panel gets this done.
2) Install the Fuel Probe in your tank. The one we sell is 12 inches long, it may be put at an angle inside the tank. Different probe lengths are available from Aircraft Spruce. Some are bendable. (You bend them only where they enter the tank, the remainder of the probe goes through the tank at a diagonal.) Here's a photo of a fuel probe, installed in a tank with a depth of 8". The capacitive probe was bent and fitted through a hole in the top of the tank, then attached to a small block of wood and bonded to the tank with a fuel proof expoxy.
 |
| Capacitive Fuel Probe installed in tank |
3) Attach our Fuel Gauge to a source of power. A 9 volt battery works great; as does regular +12 volt system power. (+12 volts is probably a better choice, because the separate fuel probe requires +12 volts). This power goes to the power connector on the back of our unit. Attach the ground as well.
4) Attach the Capactive Fuel Probe to a source of power. +12 volts works just fine. This goes to the red wire, attach the black wire to ground.
5) Attach the Fuel probe sender level wire (yellow color) to our Fuel gauge connector (usually this wire is marked with "FG" or something like that; it's the middle position on the fuel gauge connector). (Yes, you'll have to run some wire from your fuel tank to your fuel gauge.)
6) These two units also need a common ground. This just means that the ground from the Fuel Gauge must be common to the ground at the Fuel Probe. This is usually done through the metal frame of the airplane, but can also be done by a good ground wire as well.
At this point, if you turn everything on, you'll show the amount of fuel in your tank. Well, not exactly; because it hasn't been calibrated yet.
Calibrating the Belite Fuel Gauge.
USE CARE AND CAUTION WHEN HANDLING GAS!!!!!
1) Make sure the end of the fuel probe is about 1/4 or 1/2 inch above the bottom of your fuel tank.
2) When the fuel tank is empty, adjust the 'empty' trimmer on the fuel probe so that the only LED illuminated on the fuel gauge is the 0% (EMPTY) indication. Be careful, it may be a very slight adjustment.
3) When the fuel tank is full, adjust 'full' trimmer on the fuel probe so that the 100% LED (FULL) is illuminated. Be careful, try and adjust so that the 100% LED is barely enabled.
4) Empty the gas tank and verify the LED indications as the tank empties. Readjust trimmers as necessary.
5) Use common sense when flying with your new Belite gas gauge. Assume that your gas gauge is inoperative if it does not agree with your normal pilotage fuel consumption calculations.
Fuel Gauge FAQ's
1) Will the Belite Fuel Gauge work with anyone's fuel probe? A: It will work with any fuel probe that outputs 0 to 5 volts.
2) What happens when the gas is below the bottom of the fuel probe? A: If properly calibrated, the Fuel Gauge will show 0%; your engine will continue to run as long as you have usable fuel in the tank.
3) How are the markings on the Fuel Gauge designed to work? A: When the Fuel Gauge indicates 50% remaining, that means that the tank has at least 50% of the fuel capacity remaining. When the the 50% LED goes out, and the 40% LED turns on, this means you have between 40 and 49% of your fuel remaining.
4) Are the readings accurate? A: If properly installed and calibrated in a square tank, they are reasonably accurate. However, you must test your readings using a real fuel consumption test, with dip level verification of the tank readings.
5) Are the readings accurate in a round tank (such as Belite's spun aluminum fuel tank, placed on its side)? A: They are reasonably accurate at the full, 60%, 50%, and 40%, and at empty. Due to the circular tank, the fuel reading is not linear. However, it's still completely useful information, because it can be used to compare fuel burn and gain judgement to fuel exhaustion from flight to flight.
6) How much power does the Belite Fuel Gauge use? A: About 20ma. It will run off of 8 AA (== +12 volts) batteries for approximately 100 hours!!!! (Not counting battery current drain of Fuel Probe.)
7) What is the labeling on the face of the Belite Fuel Gauge made from? A: It's made from a waterproof membrane. It doesn't shrink or wrinkle in humidity. (This is a recent change to our production.)
8) My Fuel Gauge has four wires going to the connector?! What's the fourth wire for? A: Two wires are power (ground and +12v); one wire goes to the fuel probe, and the fourth wire is a dimmer input to the LEDs. Leave it UNCONNECTED and you will have full brightness. Connect to +12V, and the LED display will dim.
Have any more Fuel Gauge questions? Give us a call or send us an email, info@beliteaircraft.com
-- James


