Please note: James' blog has moved to a Wordpress site. To access it, please visit
http://jameswiebe.wordpress.com/. All posts have been transferred to the new site, and all new posts will only be accessible via Wordpress. Thank you for your interest!
I thought you might like to see the back of the instrument panel. I also thought you might like to get some insight as to how the instrument panel is wired up, so let's do it.
The instrument panel in my aircraft is assembled from very lightweight Belite instruments. My instruments provide information which is essential for flight in an inexpensive and easy to read manner. As I was flying earlier tonight, I took another photo of the instruments inflight:
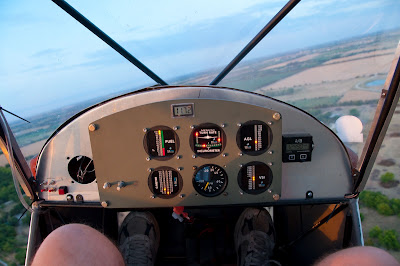 |
| Belite Instrument Panel in flight |
Kewl. I like 'em.
The panel is designed to quickly be removed, so I can fly with minimal instrumentation when I want to. (The blank hole on the left main panel is for an EGT/CHT, which will be added. It's the only instrument I need when I pull the main panel.)
Earlier today, I took a picture of the back of the exact same instrument panel, and there definitely is some electronic magic going on in the wiring:
 |
| backside of Belite Instrument panel |
Some notes:
1. The top right module is a +12V regulator. I use it to regulate the raw voltage from the main system/starter battery. (I use an extremely lightweight lithium polymer 14.4v battery for the starter, which is a little hot to use with the instruments. When fully charged, the lithium polymer battery reaches over 16.0 volts.)
2. A potentiometer is used to control instrument dimming. It's in the lower right corner, immediately below the power regulator. One side is connected to +12V, the other to ground. The wiper (middle) output of the potentiometer connects to all the instruments to provide dimming level input. The dimmer worked really sweetly when I was flying in dusk conditions earlier tonight. More on that in another post.
3. Not shown is an inline fuse, 1A, which is connected to the power regulator input.
4. YES, that is a steam gauge air speed indicator in the lower middle. I don't have one in stock right now, so I used an old fashioned steam gauge.
5. The shrink wrapped modules are either electronic altitude (pressure) sensors or VSI sensors.
6. That's a voltmeter at the top. It's only connected to show regulated voltage (around 12v) but I might add a switch to allow selection between unregulated and regulated voltage. A hole is already drilled for the switch.
7. All the instruments have their power wired from a common avionics power switch (lower right side of panel), along with a common ground. Just switched power, ground, and dimming to each instrument.
I put it all on a scale, and the weight is 1 pound and a fraction of ounce.
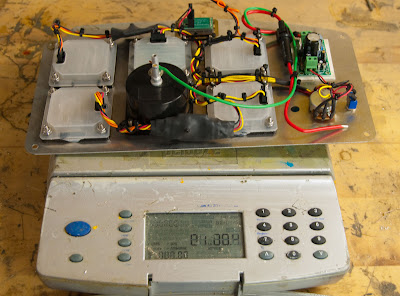 |
| Instrument panel, 1 pound 0.4 ounces, including wiring, switches, regulator, and panel. |


