Please note: James' blog has moved to a Wordpress site. To access it, please visit
http://jameswiebe.wordpress.com/. All posts have been transferred to the new site, and all new posts will only be accessible via Wordpress. Thank you for your interest!
THIS IS PART 1 IN THE CABIN ASSEMBLY SERIES.
Part 2 may be found
HERE (click).
Part 3 may be found
HERE (click).
Let's dig into building an aluminum cabin for a Belite Ultralight Airplane.
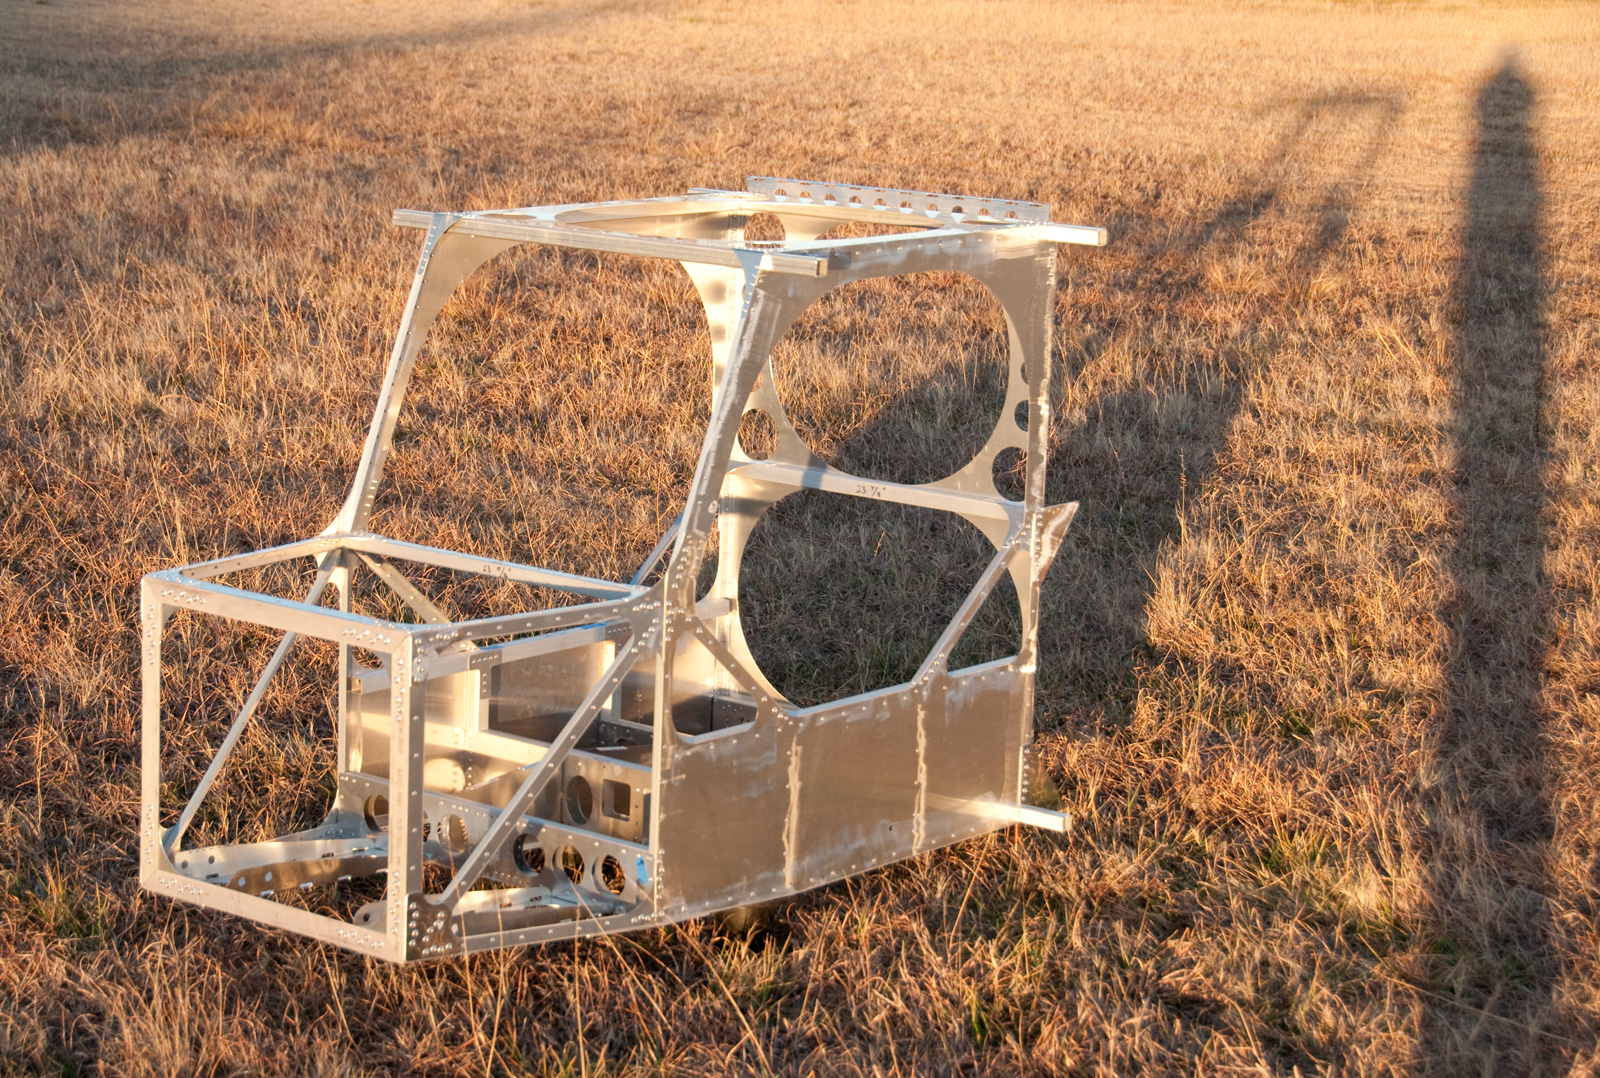
Sometimes, it's good to have a vision of where we are trying to get, and in our case, it is represented by the following photo:
 |
| Belite Aluminum Cabin for ultralight airplane |
Here's the ground rules:
a. 99.97% of all holes are pre-drilled. There are a few you have to drill, for reasons which are usually obvious. You'll have to drill into the matching longerons and tubings, and this is very easy because it matches to the holes in the gussets.
b. Every piece of aluminum gusset is pre-cut and pre-drilled on our CNC machinery. The accuracy is amazing.
c. You are responsible for cutting and fitting aluminum longerons (all metal square tubing and angle material) to length. This is easily done on a bandsaw or a tablesaw, but if you use a tablesaw, you must use a carbide blade. Wear eye protection.
d. Make sure you clean and deburr all components. I will never bring this up again in this document, but you will see plenty of evidence of deburring in the photos.
e. A few clecos go a long ways. I also like to use cleco clamps. We buy them for $4.95 / dozen in Wichita, and you can do the entire airplane with a hundred or so. Two hundred would be a little better.
f. We include some 1/8" rivets in the kit to get you going. We don't include 3/16" rivets. Our rivets are aluminum / steel commercial quality rivets. You may wish to upgrade to aircraft grade rivets. In certain locations, you may wish to buck solid rivets. Always make sure you use the appropriate length of rivet.
g. All holes in the pre-drilled gussets are 1/8" in diameter, but many of the holes will be drilled out for use with 3/16" rivets. Examine the construction photos for advice.
h. Don't get ahead of the pictures. Don't drill out if it's not drilled out in the photo; don't rivet if it's not riveted in the photos. Having said this, there are still a few spots where you'll have to drill out rivets after they've been pulled.
i. Make sure you get everything square. There are not many places to screw up, but a good example is the second step, where the front left and right parts are clamped on. Make sure they are exactly matched to the front of the firewall frame. Check squareness. Build on a dead flat table. Use sharp drills. Go slowly.
j. Read and understand all of these instructions before doing anything.
1. Firewall Frame. Cut the Firewall Frame from 7075T6 angle aluminum, with 45degree mitred corners. Temporarily Cleco with corner gussets (also 7075T6 aluminum). Drill out and assemble using 3/16 rivets.
 |
| Firewall Frame for Belite Ultralight Aircraft |
2. Clamp Front Left and Right Master Gusset.
 |
| Clamp on Front Left and Right Master Gusset. |
3. Clamp on Left and Right Longerons. These are approximate 60" in length. They are 2024T3 aluminum, with dimensions of 0.875 x 0.500 x 0.063". Other than the firewall, this is the only angle aluminum used in our cabin, and we will call it "structural angle" hereafter.
 |
| Clamp on Left and Right Longerons. |
They are butt jointed on the inside, as shown in the photo below.
 |
| Butt joint of Longeron. |
3. Cut two pieces of structural angle to 16.25" in length. Clamp and cleco in place.
 |
| Two pieces of structural aluminum, cut to 16.25" in length |
 |
| 16.25" structural angle clamped and clecoed in place. |
4. Clamp on Front Top and Bottom Master Gussets; also vertical longerons.
 |
| Front Top and Bottom Master Gussets. Bottom is slightly longer as seen in above photo. |
The Vertical Longerons are 40" in length. They are cut from structural aluminum.
 |
| Vertical Longerons are 40" in length. |
 |
| Front Top Master Gusset clamped in place. Your gusset may be pre-notched. |
 |
| Vertical Longeron clamped in place. |
 |
| Butt joint on bottom of Vertical Longeron. |
 |
| Vertical Longeron clamped in place. |
Use a Sharpie and make a mark on each Vertical Longeron, through the hole in the photo below:
 |
| Marking dot thru hole onto Vertical Longeron. |
You must make a V cut in each Vertical Longeron at the marked location. The V cut must be larger than necessary, as it is impossible to unbend and rebend it, because the metal will fail in fatigue in two bends.
(Multiple overlapping gussets carry all flight loads at this spot, but its nice to have the Vertical Longeron holding together).
 |
| Make a V cut in each Vertical Longeron at marked location. |
Then reclamp the Vertical Longerons in place.
5. Cut and fit Diagonal Longerons from Structural Angle.
You need to cut and fit two Diagonal Longerons from Structural Angle.
 |
| Diagonal Longerons cut from Structural Angle. |
 |
| Diagonal Longerons being fitted to Front Left and Right Master Gussets. |
 |
| Butt joint on Diagonal Longerons. |
6. Cleco in doubler gussets on Front Top Master Gusset.
The doubler gusset is inserted into the cleco assembly at each front top corner.
 |
| Doubler Gusset added to Front Top Master Gusset. |
7. Clamp on Front Bottom Master Gusset.
 |
| Front Bottom Master Gusset being clamped in place. |
 |
| Marking position of notch in Left and Right Longerons. |
You'll need to make a notch in the Left and Right Longerons at the marked spot, which is displaced 1/8" from the edge of the Vertical Longeron.
 |
| Notch made in Left and RIght Longerons, displaced 1/8" from alignment mark. |
After the notch is made on each longeron, it's an easy matter to pull in the two longerons. using clamps or weights:
 |
| Left and Right Longerons pulled in |
A piece of 3/4" thin wall square tubing is cut to 23 3/4"+. After trimming to the correct length, it is clamped to the Front Top Master Gusset.
 |
| Clamping in square tubing |
8. Build up the First Cross Box.
It's built from two gussets (First Cross Box Front and Rear), along with dual matching lengths of 3/4" thinwall aluminum tubing.
 |
| First Cross Box being built. |
 |
| First Cross Box, view from front. |
That ends our first installment on how to build a Belite Aluminum Cabin. We'll pick it up again in a few days.


2 comments:
Wow! You really provided the complete instructions on how to construct an Ultralight Aircraft Aluminum Cabin! If I were to make this I think I’ll be having problems cutting and fitting the aluminum longerons to length.
The aircraft industry is fascinating and it takes such precision to make aircraft parts. Aluminum is a very versatile metal because it is flexible and lightweight. These instruction do make it look easy.
Post a Comment